Current Version of Coldcard Firmware
For Mk4 (our flagship!): v5.4.1 for Mk4 released Feb 13, 2025.
For Q (the new kid): v1.3.1Q for Q released Feb 13, 2025.
Find all available downloads here.
Video: How to Upgrade Firmware
Learn how to upgrade here but start with one of those files.
Shared Improvements - Both Mk4 and Q#
- New signing features:
- Sign message from note text, or password note
- JSON message signing. Use JSON object to pass data to sign in form
{"msg":"<required msg>","subpath":"<optional sp>","addr_fmt": "<optional af>"} - Sign message with key resulting from positive ownership check. Press (0) and enter or scan message text to be signed.
- Sign message with key selected from Address Explorer Custom Path menu. Press (2) and enter or scan message text to be signed.
- Enhancement: New address display format improves address verification on screen (groups of 4).
- Deltamode enhancements:
- Hide Secure Notes & Passwords in Deltamode. Wipe seed if notes menu accessed.
- Hide Seed Vault in Deltamode. Wipe seed if Seed Vault menu accessed.
- Catch more DeltaMode cases in XOR submenus. Thanks @dmonakhov
- Enhancement: Add ability to switch between BIP-32 xpub, and obsolete SLIP-132 format
in
Export XPUB - Enhancement: Use the fact that master seed cannot be used as ephemeral seed, to show message about successful master seed verification.
- Enhancement: Allow devs to override backup password.
- Enhancement: Add option to show/export full multisg addresses without censorship. Enable
in
Settings > Multisig Wallets > Full Address View. - Enhancement: If derivation path is omitted during message signing, derivation path
default is no longer root (m), instead it is based on requested address format
(
m/44h/0h/0h/0/0for p2pkh, andm/84h/0h/0h/0/0for p2wpkh). Conversely, if address format is not provided but subpath derivation starts with:m/84h/...orm/49h/..., then p2wpkh or p2sh-p2wpkh respectively, is used. - Bugfix: Sometimes see a struck screen after Verifying... in boot up sequence. On Q, result is blank screen, on Mk4, result is three-dots screen.
- Bugfix: Do not allow to enable/disable Seed Vault feature when in temporary seed mode.
- Bugfix: Bless Firmware causes hanging progress bar.
- Bugfix: Prevent yikes in ownership search.
- Bugfix: Factory-disabled NFC was not recognized correctly.
- Bugfix: Be more robust about flash filesystem holding the settings.
- Bugfix: Do not include sighash in PSBT input data, if sighash value is
SIGHASH_ALL. - Bugfix: Allow import of multisig descriptor with root (m) keys in it. Thanks @turkycat
- Change: Do not purge settings of current active tmp seed when deleting it from Seed Vault.
- Change: Rename Testnet3 -> Testnet4 (all parameters unchanged).
Mk4 Specific Changes#
5.4.1 - 2025-02-13#
- Enhancement: Export single sig descriptor with simple QR.
Q Specific Changes#
1.3.1Q - 2025-02-13#
- New Feature: Verify Signed RFC messages via BBQr
- New Feature: Sign message from QR scan (format has to be JSON)
- Enhancement: Sign/Verify Address in Sparrow via QR
- Enhancement: Sign scanned Simple Text by pressing (0). Next screen query information about which key to use.
- Enhancement: Add option to "Sort By Title" in Secure Notes and Passwords. Thanks to @MTRitchey for suggestion.
- Bugfix: Properly re-draw status bar after Restore Master on COLDCARD without master seed.
🧙 Edge Version 6.3.5X/QX [Miniscript and Taproot support!]#
Find binary here and view release notes.
Advanced features currently in Edge:
- now with latest Mk4/Q features from 5.4.1 and 1.3.1Q releases (see above) plus recent bugfixes.
- Allow origin-less extended keys in multisig & miniscript descriptors.
- Static internal keys are now disallowed. All keys need to be ranged extended keys.
- Ranged provably unspendable keys and
unspend()support for Taproot descriptors - Address ownership for miniscript and tapscript wallets
- Miniscript and MiniTapscript support (see
docs/miniscript.md) - Tapscript up to 8 leafs.
- Taproot spending, signing, multisig.
- BIP-129 Bitcoin Secure Multisig Setup (BSMS)
- New USB commands to support Miniscript and Tapscript.
This preview version of firmware has not yet been qualified and tested to the same standard as normal Coinkite products. It is recommended only for developers and early adopters and those who need the latest features.
Older releases and their changes are listed here, the full source code, hardware details, and much more can be found in our repository on github. Other downloads are listed here.
Upgrading Your COLDCARD's Firmware#
Mark 1 Firmware Limit
Do not attempt to upgrade a Mark 1 COLDCARD beyond firmware version 3.0.6 (2019-12-19T1623-v3.0.6)!
Mark 1 hardware is no longer supported. Newer firmware versions will completely brick a Mark 1 COLDCARD. Look for the revision (Mark 1, Mark 2, Mark 3) on the back of your COLDCARD before you begin upgrading.
Introduction#
About Upgrades#
Stay up to date on firmware releases - follow our Twitter account @COLDCARDwallet, or bookmark the Coinkite Blog.
Firmware upgrades provide new features, enhancements, bugfixes, and the latest security updates to your COLDCARD.
Firmware upgrade files have a .dfu file extension and should be at least 800 KB in size. We use the abbreviation 20...-coldcard.dfu to represent the full firmware file name. Make sure to use the full file name in your commands.
COLDCARDs only load and run files signed by a Coinkite Inc. approved key.
Upgrade Menu#
The Upgrade menu allows you to load an upgrade .dfu file from a microSD card.
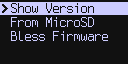
Upgrade Menu Options#
Show Version displays the version numbers of the firmware currently loaded on your COLDCARD.
From MicroSD lets you start the firmware upgrade process.
Bless Firmware marks the firmware upgrade as approved by the main PIN holder. This step is necessary if your COLDCARD loses power before the upgrade is confirmed.
Alternate Upgrade Methods#
These instructions use a microSD card to upgrade the firmware. You
can also upgrade by using the command-line tool or the
Electrum plugin. On the Mk4,
if USB drive emulation is enabled, you can simply copy the dfu file
onto the COLDCARD.
Downgrading Firmware and Older Versions#
Downgrading to an older firmware version is discouraged and may be blocked depending on your current firmware. Some firmware releases will prevent the bootloader from accepting older versions due to bugs or security issues found in older firmware. A limited selection of previously released firmware is available here.
Upgrade Procedure Using MicroSD#
What You'll Need#
- One COLDCARD
- microSD card (up to 32 GB capacity, FAT32 or FAT12 format)
- Micro USB cable, power-only preferred
- Power source for Micro USB cable, COLDPOWER or AC to USB adapter preferred
- Internet-capable device for downloading and saving files
What You'll Do#
Check Your Current COLDCARD Firmware Version#
- Connect the COLDCARD to a power source with the Micro USB cable to turn it on.
- Enter your PIN to unlock the COLDCARD.
- Select
Advanced > Upgrade > Show Version. - Compare the version shown on the screen with the latest version shown on coldcard.com/docs/upgrade. If your COLDCARD doesn't have the latest firmware version, it's time to upgrade.
Get the Latest Firmware#
- Go to coldcard.com/docs/upgrade if you're not already here. The latest firmware release will be at the top of the page.
- Save the
20...-coldcard.dfufile to your microSD card or a folder on your computer. - Decide whether you will verify the firmware's hash and signature (strongly recommended) or load the firmware on your COLDCARD without verification.
- Verifying? Go to the verification instructions.
Load the Latest Firmware on your COLDCARD#
- Save the
20...-coldcard.dfufile to your microSD card if you haven't done so already and eject the card once the file is saved. - Make sure your COLDCARD is turned on and unlocked.
- Select
Advanced > Upgrade > From MicroSD. - Press OK (✔) on your COLDCARD when you are prompted to pick the firmware image.
- Select the firmware file.
- The screen will say
"Loading. . .". Be patient, this process takes time.
Note: When the screen changes to Verifying, the red LED will
light up and stay lit until the firmware upgrade is complete. The
red CAUTION LED lets you know changes are being made or have
been made to your COLDCARD. If the COLDCARD is turned off after
the new firmware is installed but before the first successful
login, you will need to
bless the firmware
to turn the red LED off.
Do not turn off power to the Mk4 during it's 15-second upgrade process. Doing so will put it into a special recovery mode which requires a specially-prepared MicroSD card to be used.
Confirm and Finish Upgrade#
- Enter your PIN prefix when prompted after the COLDCARD reboots.
- Verify whether or not you recognize the two words displayed on the screen. These words are hardware-specific to ensure you have the correct device. A different COLDCARD will display different words.
- Enter the rest of your PIN when prompted.
- The COLDCARD will perform another verification and the green GENUINE LED will light up.
- Inspect your upgrade by selecting
Advanced > Upgrade > Show Version. The firmware version you loaded will be displayed. You have successfully upgraded your COLDCARD's firmware!
Video Tutorial#
Watch Max Hillebrand perform the firmware upgrade and verification process using Debian and a Mark 2 COLDCARD.
Optional Steps#
Red LED Lit After Restart? Bless the Firmware#
The red CAUTION LED is a safety feature warning you of unconfirmed changes to your COLDCARD. Only the main PIN holder can confirm changes. If you load new firmware and turn off the device before confirming the upgrade, the CAUTION LED will be lit the next time you turn on your COLDCARD. Blessing the firmware tells the COLDCARD that you are aware of and approve of the firmware upgrade.
- Follow the prompts on the screen to log in to your COLDCARD.
- Select
Advanced > Upgrade > Bless Firmware. - The screen will say
Verifyingthe green GENUINE LED will light up confirming your approval of the new firmware.
Once the firmware is blessed, your COLDCARD will light up the green LED on future startups.
Don't Trust. Verify the Firmware#
Verifying the firmware's hash and signature requires intermediate to advanced computer skills. It uses extra tools and adds steps, but if you use a COLDCARD, you're probably security-conscious. In that case, you may find the extra effort to be worth the peace of mind you'll get from knowing your firmware is safe and correct.
Note: PGP signature verification requires GPG. Debian and other Linux distributions include GPG. Mac and Windows users who have not already installed GPG will need to do so. Operating system-specific instructions contain links to tool downloads.
Verifying on Mac#
These instructions use GPG Keychain, a component of the GPG Suite from GPGTools.
You can also follow along with our video tutorial, How to Verify COLDCARD's Firmware.
Confirm the Hash
- Open signatures.txt so you can view its contents.
- Open Terminal, navigate to the directory where you saved the firmware and use the command
shasum -a256 20...-coldcard.dfu. - Resize or reposition the windows so you can see both the Terminal and
signatures.txtfile at the same time. - Compare the output values in Terminal with the line of text in the
signatures.txtfile next to the firmware version you saved. The hash is confirmed if the values are the same.
Verify the PGP Signature
- Save the signatures.txt file in the same location as the new firmware file.
- Save the public key
4589779ADFC14F3327534EA8A3A31BAD5A2A5B10as anew-pubkey.txtfile in the same location as the firmware andsignatures.txtfiles. - Open GPG Keychain.
- Click the Import button and navigate to
new-pubkey.txt. Select the file and click Open. A pop-up message should appear saying "Import successful". - Open Terminal and enter
gpg --verify signatures.txt. - The output in Terminal should include
Good signature from.... It is normal to seeWARNING: This key is not certified with a trusted signature! gpg: There is no indication that the signature belongs to the owner.You may ignore the warning, the signature is verified.
Once the hash and signature are verified, load the latest firmware on your COLDCARD.
Verifying on Linux#
Confirm the Hash
- Open signatures.txt so you can view its contents.
- Use the command line to navigate to the directory where you saved the firmware and enter the command
sha256sum 20...-coldcard.dfu. - Resize or reposition the windows so you can see both the command output and
signatures.txtfile at the same time. - Compare the output value from the command with the line of text in the
signatures.txtfile next to the firmware version you saved. The hash is confirmed if the values are the same.
Verify the PGP Signature
- Save the signatures.txt file in the same location as the new firmware file.
- On the command line, enter
curl "https://keyserver.ubuntu.com/pks/lookup?op=get&search=0xA3A31BAD5A2A5B10" | gpg --importto import the public key. - Next, enter
gpg --verify signatures.txtto verify the file's signature versus its content. - The command output should include
Good signature from.... It is normal to seeWARNING: This key is not certified with a trusted signature! gpg: There is no indication that the signature belongs to the owner.You may ignore the warning, the signature is verified.
Once the hash and signature are verified, load the latest firmware on your COLDCARD.
Verifying on Windows#
These instructions use Kleopatra, which is a part of Gpg4win (GNU Privacy Guard for Windows). You only need the GnuPG Privacy Guard and Kleopatra components to verify the PGP signature.
Kleopatra requires you to have an OpenPGP signature to complete verification. If you don't have a signature to import, you can make one in Kleopatra.
Confirm the Hash
- Open signatures.txt so you can view its contents.
- Open Command Prompt and enter
certutil -hashfile C:\..\20...-coldcard.dfu SHA256, whereC:\..\20...-coldcard.dfuis the full path to the saved firmware file. - Resize or reposition the windows so you can see both the Command Prompt output and
signatures.txtfile at the same time. - Compare the output values in Command Prompt with the line of text in the
signatures.txtfile next to the firmware version you saved. The hash is confirmed if the values are the same.
Verify the PGP Signature
- Save the text from signatures.txt with an
.ascfile extension in the same location as the saved firmware file. Do not save the file as.txt, Kleopatra will not recognize it. - Save the public key
4589779ADFC14F3327534EA8A3A31BAD5A2A5B10as an.ascfile in the same location as the firmware andsignatures.ascfiles. - Open a browser and go to keybase.io/DocHex. Click on the text next to the key icon to open the public key window. You will need this window for a later step.
- Open Kleopatra and click
Import.... - Navigate to the public key
.ascfile and open it. - You will be asked to check the fingerprint of the file and given suggested options. The Keybase public key window is the trusted website. Click
Yes. - A Certify Certificate window will show the file's fingerprint, your certification, and the fingerprint's owner - in this case, Peter D. Gray. Resize or reposition the Certify Certificate window and the browser window opened in step 3 so you can see them both at the same time.
- Make sure the fingerprints in each window match and click
Certify. If you have a passphrase on your certificate, you'll be asked to enter it. A pop-up box should appear saying, "Certification successful." ClickOk. - Click
Decrypt/Verify...and opensignatures.asc. - Kleopatra will verify the signature. You may save or discard the file Kleopatra generates, it is not needed. The signature is verified.
Once the hash and signature are verified, load the latest firmware on your COLDCARD.