This guide walks through building a 2-of-3 multisig vault using three Coldcard devices. Coldcard creates the multisig wallet on-device using a single MicroSD card, with no coordinator software needed for setup.
Once the wallet is created, you will add Sparrow Wallet as a watch-only coordinator to hold the wallet descriptor, display balances and addresses, and build transactions for the Coldcards to sign. By the end, all three devices will have the wallet registered and you will have completed a test signing round.
A 2-of-3 vault needs any two of the three keys to spend, so losing one device or seed backup doesn't mean losing your funds. All three devices need the wallet registered before any can sign, which this guide covers in three phases. For background on multisig, read What is Bitcoin multisig? and 2-of-3 multisig explained.
A full video walkthrough is also available on the Coinkite YouTube Channel.
Before you begin
Before creating your multisig vault, you will need the following ready:
-
Three initialized Coldcard devices (Q or Mk5, any combination). Fully initialized means each device has its PIN set, and its seed phrase generated, recorded on physical media (paper or metal), and stored securely. Set Up Your Coldcard Q and Set Up Your Coldcard Mk5 explain the procedures in detail.
This guide refers to your three devices as Device 1, 2, and 3, and each one could be a Q or Mk5. If one of your devices is a Coldcard Q, consider using that one as Device 1. Its larger screen makes reviewing wallet details and configurations easier, though either device works fine.
-
One MicroSD card. This single card is passed between all three devices during setup, and again during the test signing round. It must be FAT32 or FAT12 formatted and 512 MB or larger. MicroSD cards are available for purchase at the Coinkite Store.
-
A computer with a MicroSD card reader. Sparrow Wallet will be downloaded on to your computer to act as the watch-only coordinator once the wallet is created, and the card reader is needed to accept the PSBT files from your Coldcards.
Sparrow can be downloaded directly from sparrowwallet.com. It is free and available for Windows, macOS, and Linux. Do not download it from a third-party site or app store listing.
Phase 1: Export xpubs from each Coldcard to a shared MicroSD card
For Phase 1, each Coldcard exports two pieces of information to a MicroSD card: its extended public key (xpub), which lets the wallet generate addresses and verify transactions for that device without ever exposing its private key, and its extended fingerprint (XFP), a short ID that identifies which device a given xpub belongs to.
Coldcard exports this information using the BIP-48 derivation path for multisig wallets, m/48'/0'/0'/2' for native segwit (P2WSH). This standardized path is what allows Sparrow and other coordinators to interpret the xpub correctly and generate matching addresses. For more on how derivation paths work, see HD Wallets and Bitcoin Derivation Paths.
When you are ready to begin, power on and sign in to each of your Coldcard devices, then follow the steps below.
-
On Device 1: insert the MicroSD card and navigate to Settings > Multisig Wallets > Export XPUB. Coldcard shows an information screen describing the file it will create and the BIP-48 derivation paths used for multisig. Review the details and press ✔/ENTER to accept.
-
Enter your account number (if applicable). If you use multiple accounts on your Coldcard, enter that account number now. Otherwise, leave it blank and press ✔/ENTER to use the default account
0. -
Save the multisig xpub file to the MicroSD card. Press (1) to save the file to the card. Coldcard writes the xpub file to the root of the MicroSD card, named in the format
ccxp-[XFP].json. Press ✔/ENTER to proceed and then eject the card from the device.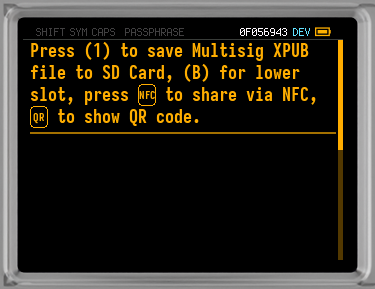
-
Insert the same MicroSD card into Device 2 and repeat steps 1, 2, and 3, then do the same for Device 3. Each device writes its own xpub file to the same MicroSD card.
When this phase is complete, the MicroSD card holds three xpub files, one per device, each named with that device's own XFP.
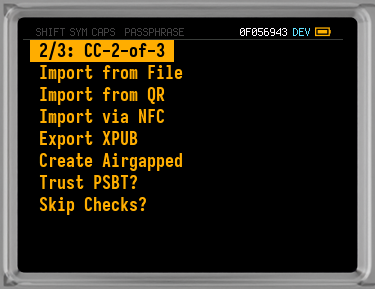
Phase 2: Create the airgapped multisig wallet on Device 1
With all three xpub files now on the MicroSD card, you can assemble the wallet. Any of the three devices could run this operation, but this guide uses Device 1 for consistency.
For this process, Device 1 reads all three xpub files from the MicroSD card, combines them with the desired 2-of-3 quorum and address type you specify, and builds the wallet descriptor entirely on-device, with no coordinator software involved.
The steps below walk through running the "Create Airgapped" multisig wallet process on Device 1 and saving both files back to the card.
-
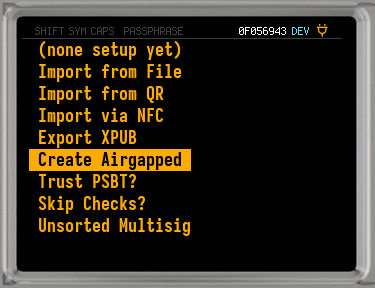
Insert the MicroSD card holding all three xpub files into Device 1. From the Main Menu, navigate to Settings > Multisig Wallets > Create Airgapped.
-
Choose the address type. Press ✔/ENTER for the default native segwit (P2WSH) address type, or press 1 for P2SH-P2WSH. This guide uses the default P2WSH. For background on how these address formats are built from the wallet's keys, see What is a Bitcoin Address?.
-
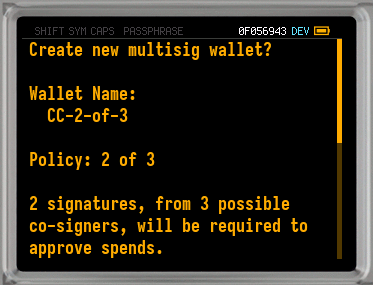
Set the number of signers needed to approve a transaction. You can create any number of multisig arrangements, but 2-of-3 is the default for a personal vault. Press ✔/ENTER to continue with 2 signers. Coldcard determines the total number of co-signers (3) from the number of xpub files it found on the MicroSD card.
-
Review the wallet details and confirm. Coldcard shows the quorum policy (2 of 3), address type, and derivation path. You can double check the extended public keys of each co-signer by pressing 1 if you want. If anything looks incorrect, press X/CANCEL to back out and return to step 1. Once everything looks correct, press ✔/ENTER to create the wallet.
-
Save the Coldcard export file to the MicroSD card. Press 1 and Coldcard writes a Coldcard export file named according to the wallet's policy, for example
export-CC-2-of-3.txt. This is the file Devices 2 and 3 will use to register the wallet in Phase 3, and the file Sparrow will import directly as your watch-only coordinator. Press ✔/ENTER to continue.Coldcard will ask if you you want to write an Electrum wallet JSON file (for example
el-CC-2-of-3.json) to the same card. You won't need this file for the Sparrow setup in this guide, but it's there if you ever want to use an Electrum-based coordinator instead. Press ✔/ENTER to complete.
The Multisig Wallets Menu on this Coldcard will now show the multisig wallet you just created.
The multisig configuration file is now saved on the MicroSD card, and Device 1 has been registered to be used as a signer.
Phase 3: Register the wallet on Devices 2 and 3, and set up Sparrow
Devices 2 and 3 now need to be registered to the multisig wallet. Since any two of the three devices may be asked to sign a transaction, all three need the same wallet registered before the vault is usable.
The steps below register the wallet on Devices 2 and 3, enable full address display on all three devices, and connect Sparrow as your coordinator.
-
On Device 2: insert the MicroSD card and navigate to Settings > Multisig Wallets > Import from File. Select the Coldcard export file created in the previous phase (
export-CC-2-of-3.txt). Coldcard displays the wallet details: quorum (2 of 3), derivation path, and address type. Press ✔/ENTER to save the information to Device 2. -
Repeat that process for Device 3, using the same MicroSD card and the same Coldcard export file. When both Device 2 and Device 3 have confirmed, every device has the wallet registered and is ready to sign.
Set up Sparrow Wallet
Once all three devices are registered, you can now set up Sparrow Wallet on your computer. Sparrow will import the Coldcard export file to act as your watch-only coordinator for building and broadcasting transactions.
-
On your computer, insert the MicroSD card and open Sparrow. Go to File > Import Wallet, find the Coldcard Multisig, and select Import File. Select the Coldcard export file (
export-CC-2-of-3.txt) that Device 1 created in Phase 2. Enter a name for your wallet and click Create Wallet. You can also set a password for your wallet at this stage.You have now successfully imported your multisig wallet into Sparrow. You can visit the Settings tab to review the details of your wallet, including each of your three keys along with their derivation paths and xpubs. You can label each of these keys if you want.
-
Verify that all three devices and Sparrow show the same receiving address. To confirm setup was successful, go to the Receive tab in Sparrow and note the first receiving address (index 0).
On each Coldcard, go to Address Explorer from the main menu and navigate to the first receiving address. Compare the full address on each device against Sparrow character by character. All three devices plus Sparrow must display the same Bitcoin address. If any device shows a different address, there may have been an error in setup.
Test signing round
Before you send any significant bitcoin into the vault, it is recommended to perform a successful test signing round. This confirms that two devices can sign a PSBT, that Sparrow can broadcast the result, and that the entire workflow functions as expected.
-
Send a small test amount to the multisig receiving address shown in Sparrow. Any small amount sufficient to cover the transaction fee will work. Wait for the transaction to appear in Sparrow as unconfirmed or confirmed before continuing.
-
In Sparrow, create the test transaction and save it as a PSBT. Go to the Send tab and enter a destination address you control outside this vault (for example, a single-sig wallet address), along with the test amount and a fee rate. Click Create Transaction, review the details, then click Finalize Transaction for Signing.
Click Save PSBT to save the
.psbtfile to the MicroSD card, for example with a name likemultisig.psbt, and then eject the card. -
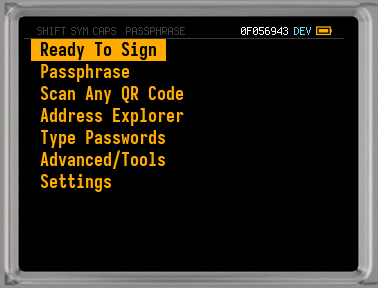
Insert the MicroSD card into Device 1 and navigate to Ready To Sign from the Main Menu. Coldcard detects the PSBT file and shows the transaction details: recipient address, amount, and fee. Verify the recipient address matches what you entered in Sparrow, as well as the amount and fee.
Press ✔/ENTER to sign. Coldcard then signs the transaction and writes the partially-signed PSBT (one of two required signatures) back to the card. It displays the name of this partially signed transaction, but does not delete the original transaction. Eject the card.
-
Insert the MicroSD card into Device 2 and navigate to Ready To Sign. Select the newly updated partially-signed PSBT. Review the same transaction details and verify them as in step 3. Press ✔/ENTER to sign.
Device 2 adds the second required signature, satisfying the 2-of-3 quorum, and Coldcard writes the fully-signed
.psbtfile back to the card, displaying the updated PSBT file name.On firmware that supports On-Device Finalization (Mk5 v5.4.2+ / Q v1.3.2Q+), Coldcard also writes a finalized
.txnfile, ready to broadcast directly from Sparrow without a separate finalization step. Eject the card. -
Insert the MicroSD card into your computer and load the result back into Sparrow. How you do this depends on whether the Send tab from step 2 is still open in Sparrow.
If the Send tab is still open, click Load Transaction in the Signatures area and select the signed PSBT from the card. Once the signature threshold is met, the Broadcast Transaction button appears.
If you closed Sparrow or are starting fresh, go to File > Open Transaction > File... and select the finalized
.txnfile if On-Device Finalization produced one, or the fully-signed.psbtfile otherwise. -
Click Broadcast Transaction to send the signed transaction to the Bitcoin network.
The test round is complete, demonstrating that your multisig wallet is capable of receiving and sending bitcoin.
Back up your multisig configuration
Setting up a multisig vault creates two kinds of backup material: three separate seed phrases (one per Coldcard) and one shared multisig configuration. Both are required to recover the vault.
-
Each Coldcard's seed phrase. Each of your three Coldcards has its own seed phrase, backed up the same way as any single-sig wallet (recovery words, stored securely and separately from the other two). Losing one seed isn't fatal in a 2-of-3 setup, but losing two is.
-
The multisig configuration. This is the quorum, all three xpubs, the derivation path (m/48'/0'/0'/2'), and the address type (P2WSH). It's what lets any wallet software recognize this vault's addresses and co-signers. Without it, your three seed phrases alone can't reconstruct the vault. You'd have to redo Phases 1 and 2 manually.
This multisig configuration currently lives in three places: the Coldcard export file (export-CC-2-of-3.txt) from Phase 2 on the MicroSD card, Sparrow's wallet file on your computer (created when you imported it in Phase 3), and as part of that Coldcard's own encrypted on-device backup (covered below).
Before depositing significant funds, complete these steps:
- Copy
export-CC-2-of-3.txtto a second location (another MicroSD card, USB drive), separate from your seed backups. - On each of the three Coldcards, go to Advanced/Tools > Backup to create an encrypted
backup.7z. - In Sparrow, go to the wallet's Settings tab and click Export to save a copy of the configuration in case you need to set up Sparrow on another computer.
- Confirm you can locate all of it: three seed backups, three Coldcard
backup.7zfiles, the export file, and the Sparrow export.
Troubleshooting
If the wallet does not register correctly or addresses do not match, the table below covers the most common causes and how to fix them.
| Symptom | Likely cause | Resolution |
|---|---|---|
| Coldcard shows "Wrong XFP" when signing | The wrong seed or BIP-39 passphrase wallet is active on this device | Load the correct seed or passphrase for this co-signer, then re-import the PSBT and sign again |
| Coldcard does not show the config file during import | Wrong file selected, or the Coldcard export file is not in the MicroSD root | Confirm export-CC-2-of-3.txt is in the MicroSD root, not a subfolder. If it's missing, re-run Create Airgapped on Device 1 |
| Sparrow shows addresses that do not match any Coldcard | Wrong derivation path used during xpub export on one or more devices, or the wrong Coldcard export file was imported | Re-export all xpubs using the BIP-48 Multisig path (m/48'/0'/0'/2'), recreate the wallet with Create Airgapped, and re-import the resulting Coldcard export file into Sparrow using the Coldcard Multisig import type |
| Coldcard shows a truncated address in Address Explorer | Full Address View not enabled for this multisig wallet | Navigate to Settings > Multisig Wallets > Full Address View to enable complete address display |
| PSBT shows "Troublesome change outs" warning | Change address is not on the expected derivation path | Verify that the change address shown belongs to the multisig wallet. If it does, approve. If it is an unrecognised address, reject and investigate in Sparrow |
What to do next
Your multisig vault is set up and the test signing round confirmed it works. The vault is now ready to receive bitcoin for long-term storage. For a full signing walkthrough covering QR-based and MicroSD-based workflows, see the air-gapped signing guide.
Next guides: With your watch-only wallet set up, the next step is signing transactions. Coldcard supports three air-gapped signing methods.
- MicroSD Card Air-Gapped Signing with Coldcard
- QR Code Air-Gapped Signing with Coldcard
- NFC Tap Air-Gapped Signing with Coldcard
Further reading: What is Bitcoin multisig? deepens the conceptual understanding of what you just built.
Related guides
What is Bitcoin Multisig?
The foundational concept behind what this guide builds. Start here if anything was unclear.
2-of-3 Multisig Explained
A detailed walkthrough of the 2-of-3 threshold scheme and how key recovery works.
Coldcard and Sparrow Wallet Setup
The single-signature prerequisite guide that precedes this one.
Collaborative Custody Bitcoin
How custodial multisig services like Casa and Unchained compare to the self-managed vault you just built.