
 Shop
ShopThis guide walks through connecting a Coldcard Q or Mk5 to Sparrow Wallet for the first time. By the end, you will have a watch-only Sparrow wallet, letting you track your addresses, display balances, and prepare transactions for signing.
The recommended workflow uses a MicroSD card or QR code to transfer the wallet descriptor, so your Coldcard never has a live data connection to a computer. A USB-connected option is also covered for readers who prefer it.
The screenshots and menu labels in this guide were captured on Coldcard Q firmware v1.4.0Q and Mk5 firmware v5.5.0. These are not the current recommended releases. Before use, check the current security status, install and verify the current signed firmware, and expect some menu paths to differ.
Before you begin
Secure the wallet before funding it: If the seed was generated on firmware covered by the July 2026 advisory, follow the migration guide; updating alone does not repair that seed. For a wallet intended to hold an amount whose loss would be materially harmful to you, use at least 50 private rolls of a fair physical six-sided die during seed generation as documented in the current setup guide, then apply a strong, unique BIP-39 passphrase after verifying the base seed backup. Back up the passphrase separately, record the passphrase wallet's fingerprint, power-cycle the COLDCARD, and test recovery before depositing funds.
Before getting started with your Coldcard and Sparrow wallet, ensure you have the following:
-
Coldcard Q or Mk5, fully initialized. Complete Set Up Your Coldcard Q or Set Up Your Coldcard Mk5 first if you haven't already.
-
A MicroSD card and a way to read it on your computer. A MicroSD card is the standard way to move the wallet export to your computer. The card should be FAT32 or FAT12 formatted, 512 MB or larger.
Many laptops have a built-in MicroSD or SD card slot, sometimes with an adapter. If yours doesn't, a small USB-C MicroSD card reader works well and is inexpensive.
-
Optional, use QR codes instead of MicroSD (Coldcard Q only). The Q can export its wallet descriptor as an animated QR (BBQr), which Sparrow can scan with your computer's webcam. This guide covers the MicroSD path as the primary method, with a note on the QR option in step 3.
-
If you use a BIP-39 passphrase: apply it on Coldcard before step 1. The export reflects whichever wallet is active at the time, the base wallet or the passphrase wallet. Export with the passphrase applied if you want Sparrow to watch the passphrase wallet, or without it for the base wallet. Sparrow can only watch one at a time, so you'll need a separate export and a separate Sparrow wallet for each.
Installing Sparrow Wallet
Sparrow Wallet is coordinator software that works with Coldcard devices to help you manage your bitcoin and create transactions securely.
- Sparrow is the coordinator. It watches addresses on-chain, tracks balances, constructs unsigned transactions, and broadcasts signed transactions to the network.
- Coldcard is the signing device. A signing device (also known as a hardware wallet) generates, holds, and uses the private key required to authorize a transaction.
- The two communicate using a PSBT. The PSBT (Partially Signed Bitcoin Transaction) is a file that carries an unsigned transaction from Sparrow to Coldcard and a signed one back.
- The connection can be air-gapped. Coldcard can send and receive a PSBT with no live data connection to the coordinator at all, eliminating a category of threat related to exposing your private key to internet-connected devices.
For more on these topics, see What is a PSBT? and What is air-gapped signing?.
Download Sparrow Wallet
Sparrow can be downloaded directly from sparrowwallet.com. Sparrow is free and available for Windows, macOS, and Linux. Do not download it from a third-party site or app store listing.
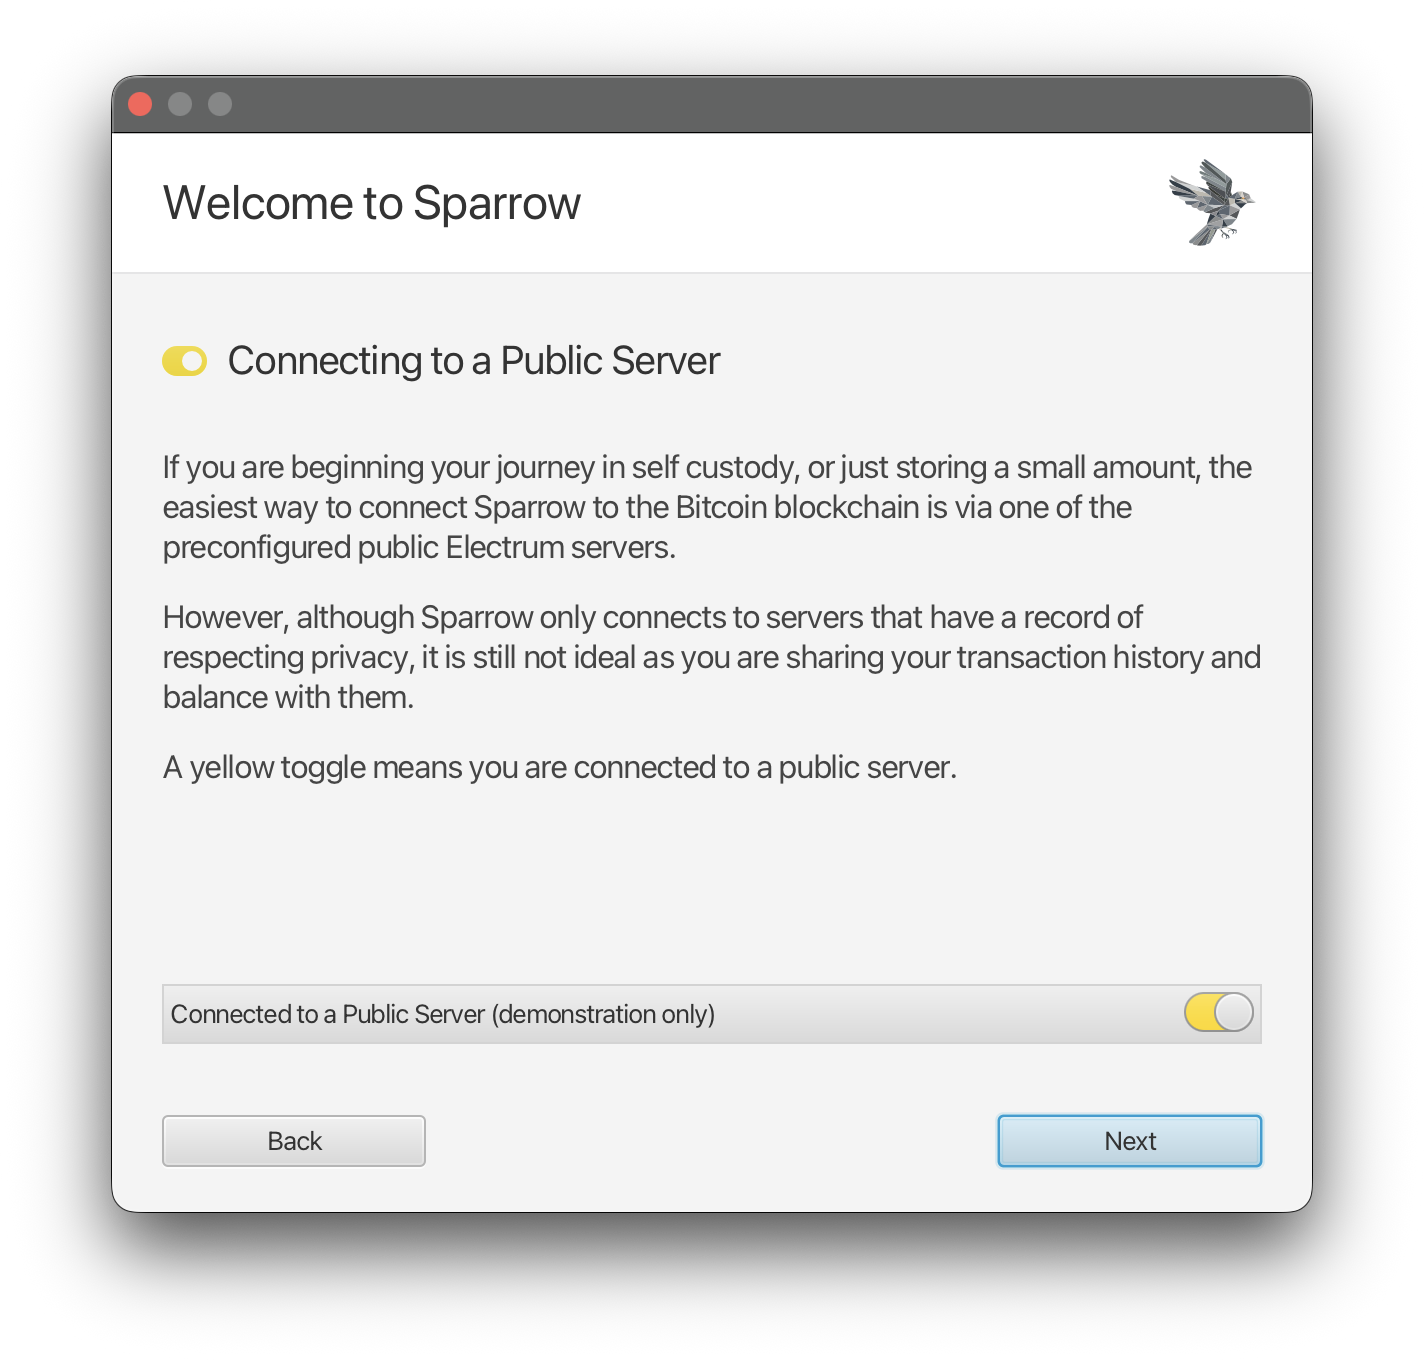
On first launch, Sparrow's introduction screens explain how it connects to the Bitcoin network to check balances and broadcast transactions: through a public server, which is simplest but shares your transaction history and balance with that server, or through your own Bitcoin node, ideally over Tor, which is the most private option since no third party sees your wallet activity. For beginners to self-custody, or for small amounts of bitcoin, a public Electrum server is the simplest choice, and what this guide uses.
To learn more about privacy, see:
Click through the introduction screens, then create a new wallet and give it a name. Call it "Coldcard" or anything you prefer. You'll land on the settings screen, where Sparrow is ready to connect to your Coldcard.
Connecting Coldcard to Sparrow
The steps to connect to Sparrow are the same for both the Q and Mk5, though the buttons and navigation differ slightly between the two devices. When ready, power on your Coldcard and follow the steps below.
-
Insert the MicroSD card into Coldcard. On the Q, use either slot A (top) or slot B (bottom), as they both work for this export. On the Mk5, insert the card into the single slot on the left side. The device does not confirm card insertion on-screen.
-
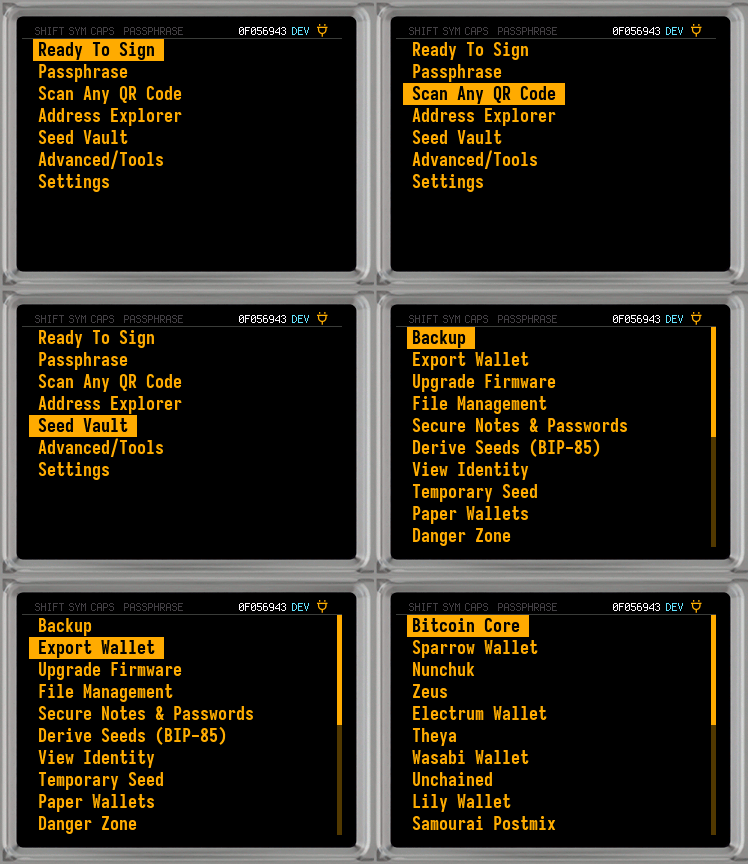
Navigate to Advanced/Tools > Export Wallet > Sparrow. From the Coldcard main menu, select Advanced/Tools, then Export Wallet. Coldcard displays a list of supported coordinators. Select Sparrow. If Sparrow does not appear in the list, your firmware may be outdated.
The device shows a brief information screen about the export. Read it and press ✔/ENTER to continue. The next screen prompts you for an account number. Press ✔/ENTER to use account 0, which is the correct choice for a standard single-wallet setup. If your coordinator is configured to use a non-zero account number, press 1 to enter it now.
-
Select MicroSD as the export method and confirm. Coldcard writes the wallet descriptor JSON file to the root of the MicroSD card, then returns to the export menu. The file contains the public key (xpub), derivation path, and address type required for Sparrow to reconstruct the watch-only wallet.
If you have a Coldcard Q and prefer to avoid moving the MicroSD card, Sparrow also supports importing via BBQr: select Show QR on the device, skip the next step relating to MicroSD card ejection, and use Sparrow's Scan option when you arrive at step 6.
-
Eject the MicroSD from Coldcard and insert it into your computer. The MicroSD appears as a removable drive on your computer, and the export file is in the root of the card. Its filename begins with
coldcard-and ends in.json. Do not rename or modify the file. -
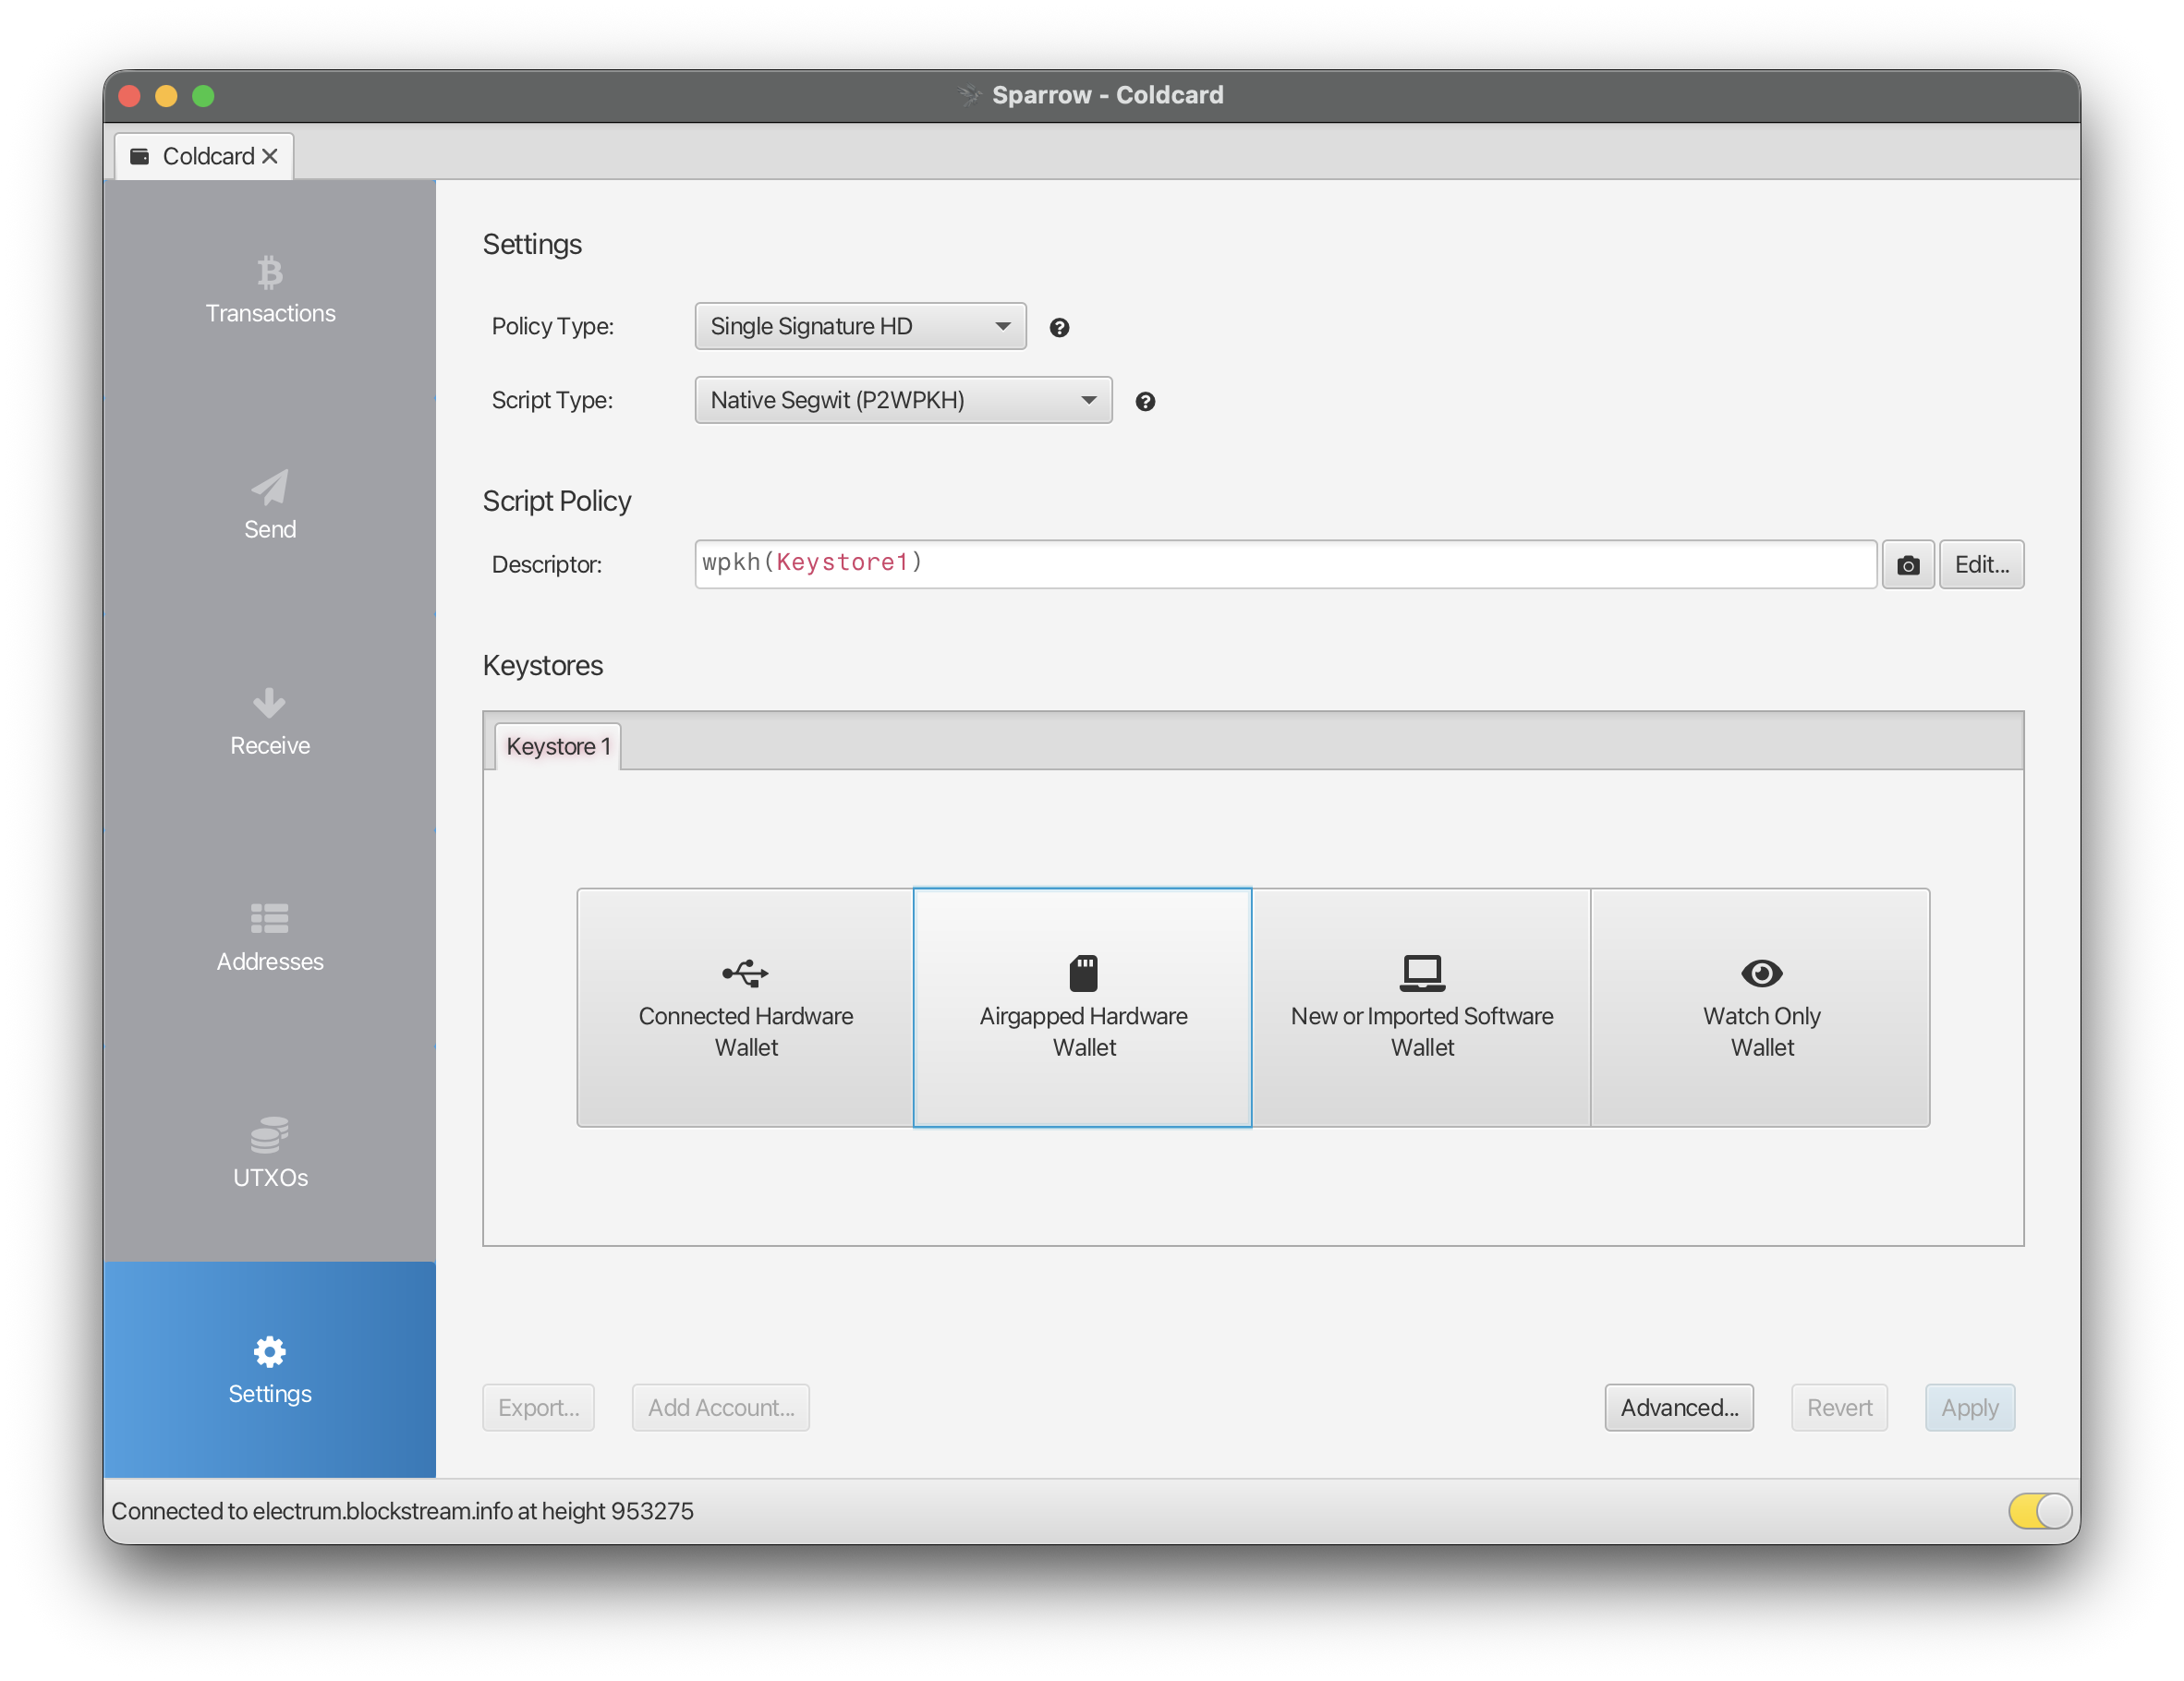
Select Airgapped Hardware Wallet. In Sparrow's New Wallet dialog on your computer, choose Airgapped Hardware Wallet.
-
Click Import File next to Coldcard. Among the hardware wallet options, Coldcard should be near the top. Click Import File and select the Coldcard JSON file from the MicroSD. Sparrow reads the descriptor and populates the wallet with the address type, derivation path, and public key. Confirm these look correct, then click Apply.
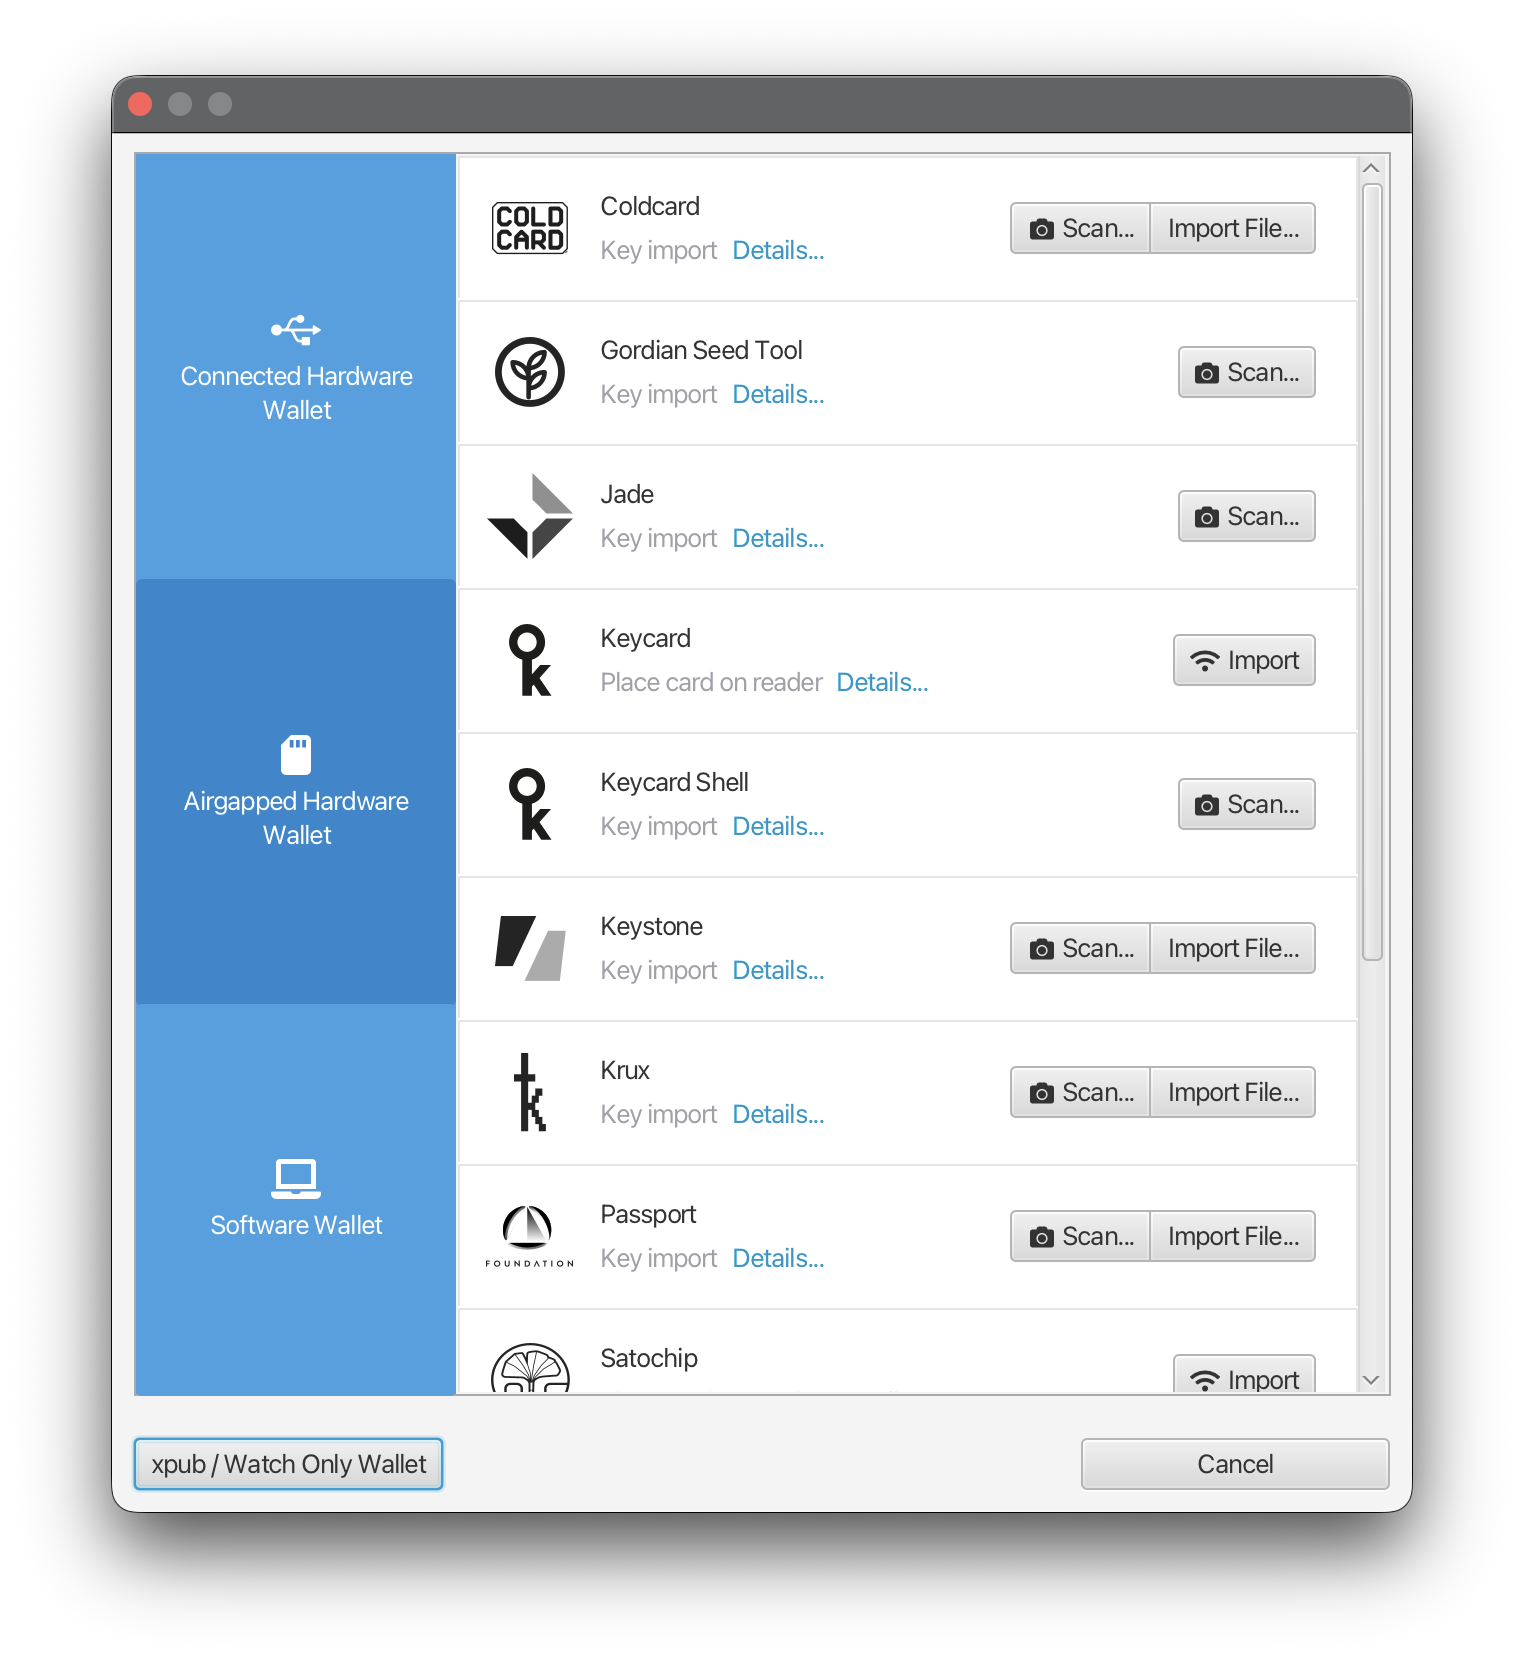
Sparrow saves the wallet and begins syncing with the blockchain for any existing history on these addresses.
Connected Hardware Wallet (USB)
Sparrow can also connect to Coldcard directly with a USB-C cable, using the Connected Hardware Wallet keystore type instead of Airgapped Hardware Wallet. The MicroSD and QR workflow above remains the recommended approach: it keeps Coldcard's USB and NFC radios off, which is how the device ships, removing an entire category of potential attacks aimed at the USB stack and drivers, with no real cost since the MicroSD export takes about as long as plugging in a cable, and on a Coldcard Q the QR option is often faster than either. Coldcard still requires you to confirm any signing on its own screen either way, but a USB connection means your computer and Coldcard are talking directly to each other.
If you still prefer USB, here's how to connect:
-
Enable USB on Coldcard. Go to Settings > Hardware On/Off > USB Port and turn it on. USB is disabled by default, so this step is required even if your Coldcard is already plugged in.
-
Connect Coldcard to your computer with a USB-C cable. Use a data-capable cable. Cables that only carry power, including most magnetic charging cables, will not work. Sparrow won't detect the device with one of these.
-
In Sparrow, go to File > New Wallet and select Connected Hardware Wallet. Click Scan. Sparrow detects the connected Coldcard and reads its keystore information directly over USB.
-
Click Import Keystore, then Apply. If you use a BIP-39 passphrase, Sparrow prompts for it during this step. Sparrow saves the wallet and begins syncing, the same as the MicroSD path.
Whichever connection method you used, the next step is the same. Confirm that Sparrow and Coldcard agree on your addresses before you receive any funds.
Verify Your Addresses
Before you receive any funds to this wallet, confirm that Sparrow and Coldcard are watching the same addresses. If the imported descriptor reflected the wrong address type or derivation path, funds sent to Sparrow's addresses might not be spendable from Coldcard.
This check takes about a minute and applies regardless of which connection method you used above.
-
In Sparrow, go to the Receive tab and note the first receiving address (index 0). This is the address you will compare against Coldcard in the next step. You can also label the address here, for example "First receive," to keep track of it as you receive bitcoin to your wallet over time.
-
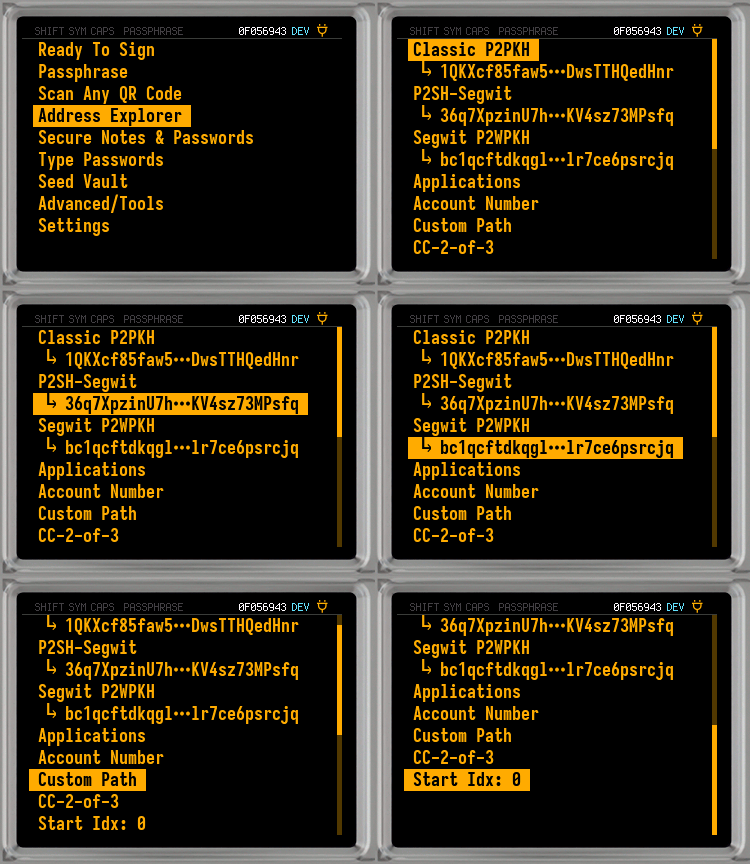
On Coldcard, navigate to Address Explorer from the main menu. Address Explorer is in the main wallet menu, not under Advanced/Tools. Scroll to the first receiving address at index 0.
-
Compare every character of the Coldcard address against the address shown in Sparrow's Receive tab. If all characters match exactly, the export succeeded. Sparrow is now correctly watching your Coldcard wallet and setup is complete. If any character differs, do not receive funds. See the Troubleshooting section below.
Troubleshooting
If something doesn't import or match correctly, the table below covers the most common causes and how to fix them.
| Symptom | Likely cause | Resolution |
|---|---|---|
| Sparrow shows an error when importing the JSON file | File is not in the MicroSD root, card is not FAT32/FAT12, or wrong file selected | Re-export from Coldcard. Confirm the file is in the root folder (not a subfolder) and the card is formatted correctly. |
| Addresses in Sparrow do not match Coldcard Address Explorer | Wrong address type or derivation path in the export, or passphrase state mismatch | Re-export from Coldcard. If using a passphrase, confirm it is applied on the device before exporting. |
| Sparrow prompts for server configuration on first launch | Required before any wallet operations on a new Sparrow installation | Select the default public server, or connect to your personal node if you run one. |
| Sparrow does not appear in the Export Wallet list on Coldcard | Firmware may be outdated | Check the current version in Settings > Upgrade > Current Version and compare with the latest release, and update firmware if necessary. |
| Sparrow doesn't detect Coldcard over USB | USB is disabled on Coldcard, or the cable is power-only | Enable Settings > Hardware On/Off > USB Port on Coldcard, and confirm the cable is data-capable, not a charge-only or magnetic cable |
| Connected Hardware Wallet option in Sparrow doesn't show Coldcard after Scan | Coldcard is locked, USB was enabled after Sparrow opened, or the cable was reseated | Unlock Coldcard, click Scan again in Sparrow, and try reconnecting the cable |
What to do next
You now have a watch-only wallet in Sparrow that tracks your Coldcard addresses. Sparrow can receive bitcoin and display your balance. The next step is signing a transaction: moving funds from this wallet requires Coldcard's approval, and Coldcard never connects to your computer to give it.
Next guides: With your watch-only wallet set up, the next step is signing transactions. Coldcard supports three air-gapped signing methods.
- MicroSD Card Air-Gapped Signing with Coldcard
- QR Code Air-Gapped Signing with Coldcard
- NFC Tap Air-Gapped Signing with Coldcard
Further reading: The articles below cover the transaction format Sparrow and Coldcard use, and what to keep in mind as you start receiving and spending from this wallet.
Related guides
What is a PSBT?
Explains the partially-signed transaction format that Sparrow creates and Coldcard signs.
What is Air-Gapped Signing?
The conceptual background for the watch-only wallet model this guide establishes.
What is Bitcoin UTXO Management?
How the coins your wallet receives become the inputs for future transactions, and why that matters for privacy and fees.
What is Bitcoin Privacy?
What a watch-only wallet reveals on-chain, and how to think about privacy as you start using this wallet.