
 Shop
ShopThis guide walks through signing a Bitcoin transaction with Coldcard using Near Field Communication (NFC). A mobile wallet on your phone creates the unsigned transaction and sends it to your Coldcard over NFC, where you review and sign on your device, and tap again to send the signed transaction back to your phone for broadcasting.
NFC is one of three air-gapped signing channels Coldcard supports. If you'd rather sign from a desktop with QR codes or a MicroSD card, see QR Code Air-Gapped Signing with Coldcard and MicroSD Card Air-Gapped Signing with Coldcard.
What is NFC tap air-gapped signing?
Air-gapped signing means moving a transaction between your coordinator software and your signing device without any direct connection between the two. Your mobile wallet builds the unsigned transaction as a PSBT (Partially Signed Bitcoin Transaction) and your Coldcard signs it, but the two devices never plug into each other, pair, or share a network link. The PSBT travels between them through a transfer medium instead, keeping your private keys isolated from any internet-connected device.
With NFC tap signing, that transfer medium is Near Field Communication: a wireless link that operates over very short distances of about 4 centimeters. You hold your phone close to Coldcard's antenna, the PSBT passes across, Coldcard signs it, and you tap again to send the signed transaction back. The transfer takes seconds and requires no pairing, configuration, or cable.
NFC differs from Bluetooth in an important way. NFC has a range of a few centimeters and requires no pairing, you simply hold the two devices close together for each transfer. Bluetooth, by contrast, pairs once and maintains a persistent connection. Coldcard's NFC tap is point-to-point and momentary by design, each tap is a single, deliberate exchange.
Most phones have NFC built in, which makes this channel mobile-first. Desktop computers typically don't have NFC built in and need a separate USB NFC reader adapter to use this workflow. For a comparison of NFC against QR and MicroSD as signing channels, see Bitcoin Air-Gap Signing Methods.
Before you begin
Before signing your first transaction over NFC, make sure you have the following ready:
-
Coldcard Q or Mk5, fully initialized. Your PIN is set and your seed phrase is backed up and stored securely. If you haven't yet set up your device, see Set Up Your Coldcard Q or Set Up Your Coldcard Mk5.
-
An NFC-compatible mobile wallet on your phone with your Coldcard holding the private key. The mobile wallet needs the public key export from your Coldcard, imported into the mobile app. The standard choice for mobile wallet used in this guide is Nunchuk.
If you're signing from a desktop instead of a phone, you'll need a USB NFC reader adapter, since most desktops don't have NFC built in.
-
Bitcoin received into your mobile wallet. Funds need to be settled into your mobile wallet before you can initiate a send transaction.
-
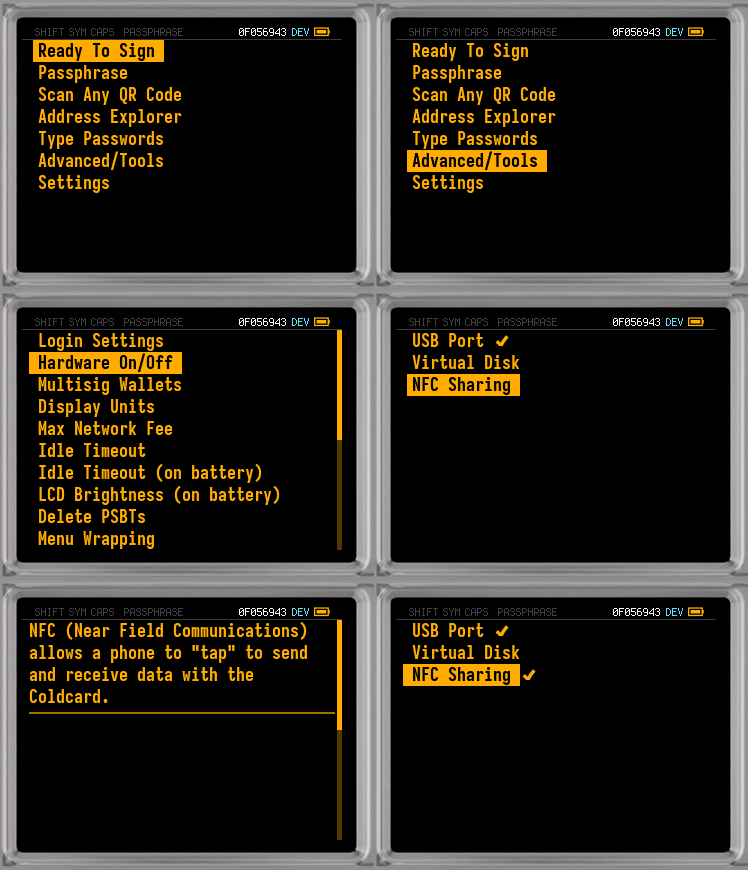
NFC Sharing enabled on Coldcard. NFC is disabled by default. Go to Settings > Hardware On/Off > NFC Sharing and enable it.
How to sign with NFC
Each transaction makes a round trip between your mobile wallet and your Coldcard over NFC. You build the transaction in your mobile wallet, send it to Coldcard with a tap, review and sign it on Coldcard, then tap again to send the signed result back to your phone for broadcasting.
To start, power-on and sign in to your Coldcard and have your mobile wallet open on your phone, then follow the steps below.
-
In your mobile wallet, tap Send. Enter the amount of bitcoin you wish to send and press Continue.
-
Enter your transaction details. Add the recipient's address and an optional note, then set your fee rate. You can customize coin selection to choose which UTXOs to spend (optional). Press Continue to review.
-
Review and confirm your transaction details. Check that everything looks correct and press Confirm and create transaction. The PSBT is now ready in your mobile wallet for Coldcard to sign.
-
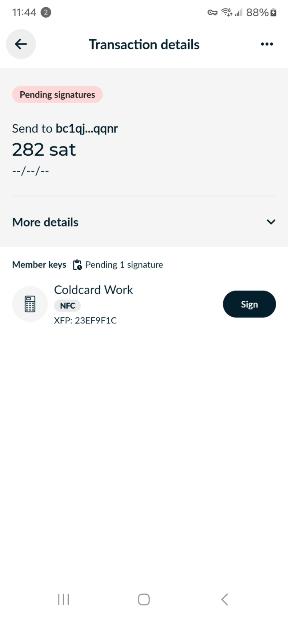
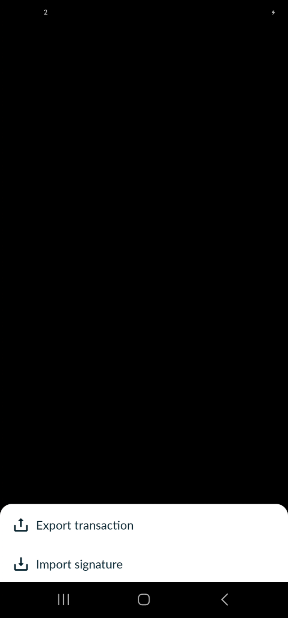
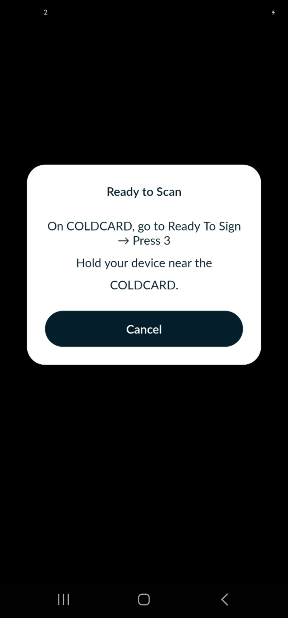
Select Sign, next to your key. Between the two options below, select Export transaction to create the PSBT and put your mobile wallet in ready-to-transfer mode over NFC.
Signing on your Coldcard
Now go to your Coldcard. Make sure NFC is enabled, by going to Settings > Hardware On/Off > NFC Sharing, then follow the steps below.
-
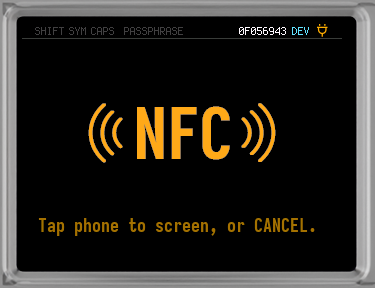
Navigate to Advanced/Tools > NFC Tools > Sign PSBT. On Coldcard Q, you can alternatively select Ready To Sign from the main menu and press the NFC key. This will enable your Coldcard to receive the PSBT via NFC.
-
Hold your phone close to your Coldcard. Placing your phone flat on top of Coldcard works well. Hold steady until Coldcard confirms it received the transaction.
-
Review the transaction details on Coldcard's screen. Scroll down to check the recipient address, amount, and fee against what you entered in your mobile wallet. Read the recipient address character by character. This screen reflects what's actually in the transaction even if your phone has been compromised.
-
Press ✔/ENTER to approve and sign. Coldcard signs the transaction and prepares the signed PSBT for transmission back over NFC.
Current standard firmware checks that the staged PSBT still matches the bytes parsed for review immediately before signing. If Coldcard reports
Transaction modified, cancel, rebuild the PSBT from a wallet you trust, and review it again. Oversized PSBTs are rejected instead of being partially staged.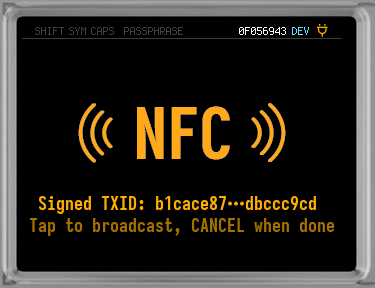
-
Hold your phone close to Coldcard again to receive the signed transaction. Coldcard transmits the signed PSBT to your mobile wallet. If your mobile wallet app has closed, open the transaction again, select Sign next to your key, and select Import transaction before tapping.
-
In your mobile wallet, tap Broadcast transaction. Your mobile wallet sends the signed transaction to the Bitcoin network.
Your transaction is now broadcast and waiting in the mempool until a miner includes it in a block. Mobile wallets typically connect to a remote server to check balances and broadcast transactions, which can see which addresses and transactions belong to your wallet.
If privacy from third-party servers matters to you, look into connecting your mobile wallet to your own node. For more on this trade-off, see What is Bitcoin Privacy? and Running a Bitcoin Node.
Signing with a multisig wallet
If your funds are held in a multisig vault, this same NFC procedure still applies, with a few differences. This section assumes you have already set up a vault following Build a 2-of-3 Multisig Vault with Coldcard, and that the funds being spent sit at an address belonging to that vault, requiring 2 of the 3 Coldcards to sign.
Building the transaction happens once. After that, the full NFC signing exchange repeats for each cosigner: the mobile wallet sends the PSBT over NFC, that cosigner's Coldcard receives, reviews, and signs it, and the result returns to the mobile wallet before the next cosigner's turn.
Below is the procedure for multisig signing via NFC:
-
Build and confirm the transaction in your mobile wallet (steps 1 through 4 above). This happens once for the whole vault, not once per cosigner.
-
The first cosigner completes the full Coldcard signing exchange. They receive the PSBT via NFC tap, review the transaction, sign, and tap again to return the partially signed result. The mobile wallet now has one signature applied to the PSBT.
-
Return to the transaction in your mobile wallet and tap Export transaction again. The mobile wallet now sends the partially signed PSBT so the second cosigner can receive it with a tap.
Key Teleport (firmware v1.3.2Q and later) offers an alternative to this round trip through the mobile wallet. The first cosigner can send the partially-signed PSBT directly to the second cosigner's Coldcard over encrypted BBQr codes, with a Teleport Password shared over a separate channel such as a phone call.
-
The second cosigner completes the signing exchange on their own Coldcard. With the 2-of-3 threshold now met, Coldcard Q (firmware v1.3.2Q and later) finalizes the transaction and returns a ready-to-broadcast
.txnfile instead of another PSBT. -
In your mobile wallet, tap Broadcast transaction. Your mobile wallet sends the finalized transaction to the Bitcoin network.
Troubleshooting
| Symptom | Likely cause | Resolution |
|---|---|---|
| Coldcard doesn't receive the transaction over NFC | NFC Sharing not enabled on Coldcard | Go to Settings > Hardware On/Off > NFC Sharing and enable it, then try the tap again. |
| Tap doesn't register | Phone positioned over the wrong spot, or held too far away | Hold the phone flat against Coldcard's antenna area (top edge on Q, near the screen on Mk5) and hold steady for a few seconds. |
| Mobile wallet has no NFC export option | Wallet app doesn't support NFC, or the feature is hidden in settings | Check your mobile wallet's settings for NFC or "hardware wallet" options, or use MicroSD Card Air-Gapped Signing with Coldcard instead. |
| "Wrong XFP" warning on Coldcard | PSBT was prepared for a different Coldcard or wallet | Confirm your mobile wallet is watching the correct Coldcard. |
What to do next
You have completed a full NFC signing round trip. Every future transaction from this Coldcard wallet follows the same pattern: build in your mobile wallet, tap to sign on Coldcard, tap again and broadcast.
Next guide: QR Code Air-Gapped Signing with Coldcard, a desktop-friendly alternative channel using your screen and webcam instead of NFC.
Further reading: Bitcoin Air-Gap Signing Methods compares QR, MicroSD, and NFC as signing channels.
On privacy: What is Bitcoin Privacy? covers what a watch-only wallet and remote servers can see about your transactions.
Related guides
What is Air-Gapped Signing?
The conceptual article that explains what this guide demonstrates.
What is a PSBT?
Explains the partially-signed transaction format used throughout this workflow.
Bitcoin Air-Gap Signing Methods
A technical comparison of QR, MicroSD, and NFC as air-gapped signing channels.
QR Code Air-Gapped Signing with Coldcard
A desktop-friendly signing channel using your screen and webcam.