The Coldcard Mk5 is a bitcoin-only signing device. It generates and stores your private keys offline, and never connects to the internet. Sending and receiving bitcoin transactions using your Coldcard device using Sparrow Wallet as your coordinator is covered in Coldcard and Sparrow Wallet Setup.
This guide covers the initial setup of a Coldcard Mk5: receiving and inspecting the device, learning the layout and keys, setting a PIN, generating a seed phrase, and completing the backup verification quiz. When you are done, you will have a fully initialized device with a confirmed backup, ready to transact with bitcoin.
Before you begin
Before getting started, you will need to have bought and received a Coldcard Mk5. You can purchase directly from Coinkite at coinkite.com or from an approved reseller.
To proceed with setup, have the following with you:
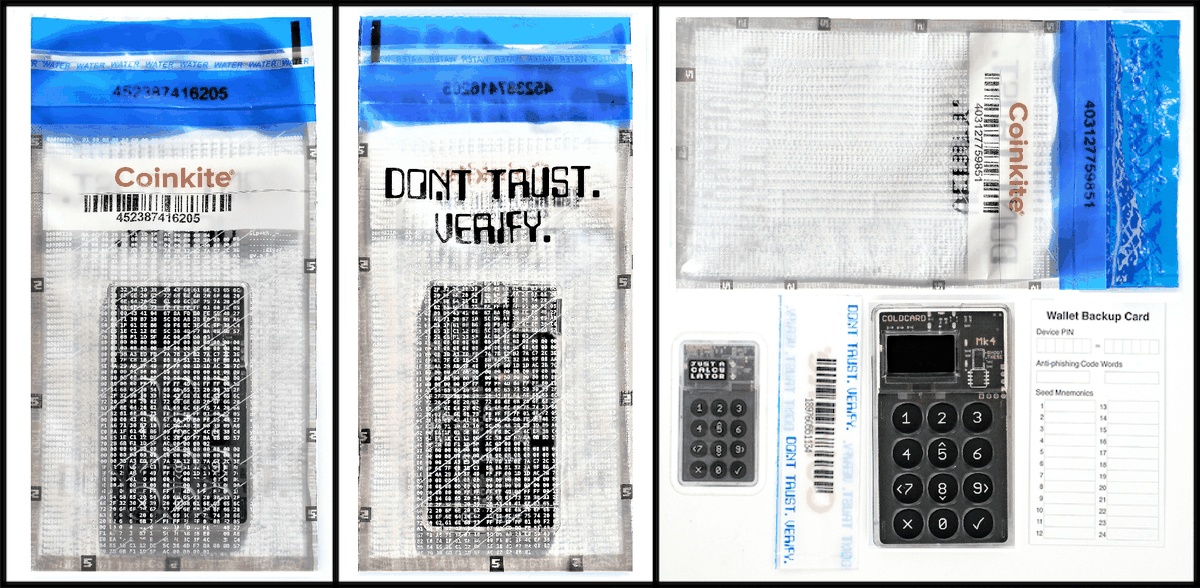
- Coldcard Mk5 in its factory-sealed tamper-evident bag.
- Power source. A USB-C cable and power source (computer, wall adapter, or Coldpower Adapter with a battery). The Mk5 has no internal battery and requires USB-C power at all times.
- A pen. A paper backup card is included in the box for writing down your PIN, anti-phishing words, and seed phrase. For a more durable backup for your seed phrase, you can record it on a metal plate.
- MicroSD card. This is not used for initial device setup, however, it is recommended to have at least one MicroSD card available as your signing method and for firmware updates. MicroSD cards must be FAT32 or FAT12 formatted and be 512 MB to 32 GB. MicroSD cards are available for purchase, along with additional device accessories.
Get to know your Coldcard Mk5
Before starting the setup steps, spend a minute getting familiar with the Mk5's layout. The Mk5 is not a touchscreen. All navigation is done via the 12-key numeric keypad and dedicated navigation keys.
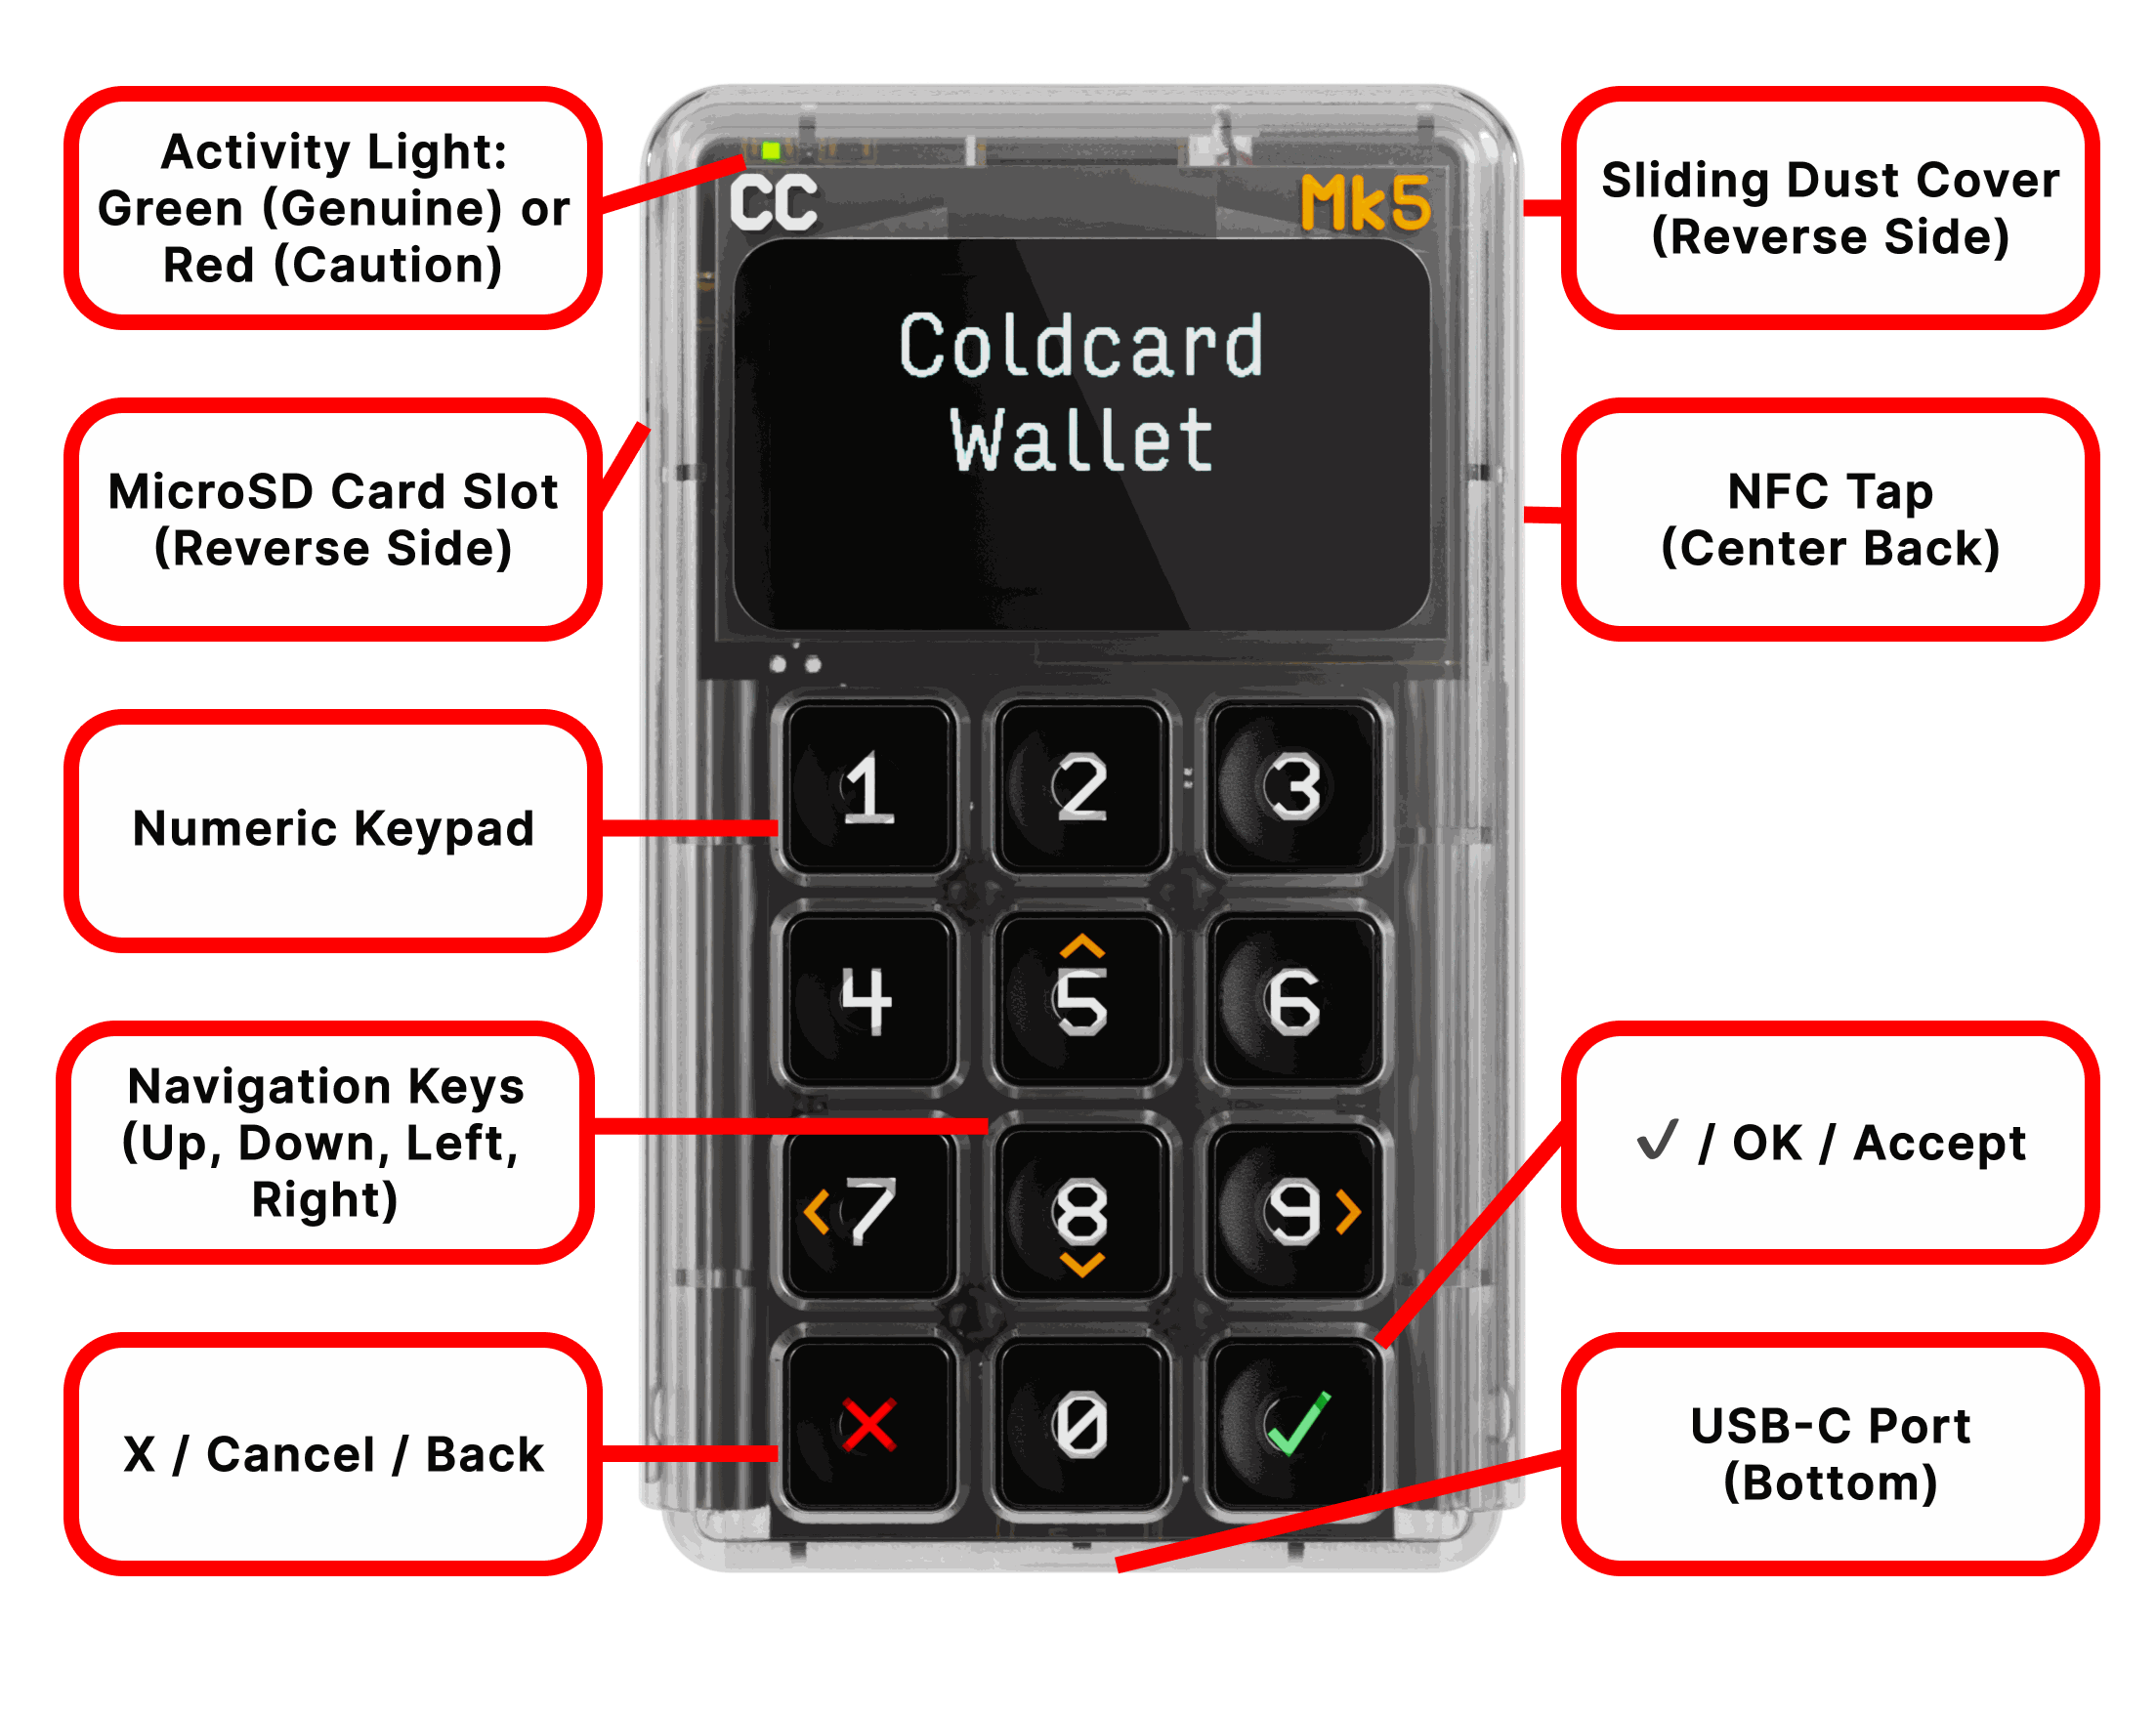
Keys and navigation
The Mk5 has a 12-key numeric keypad on the front of the device. The key layout works as follows:
- Menu selection: press the number shown next to a menu item to select it
- Ok / Accept / Confirm: press the checkmark (✓) key on the bottom-right
- Go back / Cancel: press the X key on the bottom-left
- Scroll or Navigate: press the keys with orange arrows to scroll up/down or left/right (5 is up, 8 is down, 7 is left, 9 is right)
- PIN entry: press number keys directly to enter digits
Screen and status indicators
The Mk5 has a monochrome LCD Gorilla Glass screen. The device has a green/red LED in the top left corner. During normal operation, the green LED should be lit. If the red LED is on after entering your PIN, stop and investigate before proceeding.
Power
The Mk5 has no internal battery. It requires USB-C power source at all times during operation. The device powers on automatically when a USB-C cable is connected to a power source, and no button press is required.
To power off, navigate to the shutdown option in the Settings menu.
MicroSD card slot
The Mk5 has a single MicroSD card slot in the top-left side of the device. Insert the card with the gold contact points facing toward the screen. For initial setup, no MicroSD card is required.
QR Codes
The Mk5 can display QR codes, for example to show a wallet descriptor or a PSBT for a camera-equipped coordinator to scan. It has no camera, so it cannot scan QR codes itself. Use a MicroSD card or a USB-C connection to transfer data onto the device.
Setting up your Coldcard Mk5
Upon receiving your Coldcard Mk5 in its tamper-evident bag, follow the below step-by-step procedure to set it up.
-
Inspect the tamper-evident bag. Examine the bag for signs of tampering: torn seals, re-sealed areas, unusual adhesive residue, or misaligned perforations along the edges. Confirm that the serial number printed on the bag exterior matches the serial number on the device inside.
If the bag appears compromised in any way, do not power on the device. Contact support@coinkite.com before proceeding.
-
Power on the Coldcard Mk5. Connect the USB-C cable to the Mk5 and to your power source. The device powers on automatically with no button press required, and the screen displays the Terms of Sale on first boot.
-
Accept the Terms of Sale. Read the screen, using the 5 key to scroll up and the 8 key to scroll down through the full text. Press ✓ at the bottom to accept.
-
Verify the serial number on screen. After accepting the Terms of Sale, the device displays the Coldcard's serial number on screen. Confirm this number matches the serial number on the bag exterior and the tear-off tab inside the bag. All three should be identical. Press any key to continue to the initial setup screen.
After accepting the Terms of Sale, the device shows multiple options: Choose PIN Code, Advanced/Tools, and Bag Number. Select Choose PIN Code to proceed with device setup.
PIN Setup
After selecting Choose PIN Code, you'll see an explanation to read before you can enter your PIN. Scroll down and read through the explanation carefully before pressing ✓.
How the PIN system works
The Coldcard PIN has two parts, separated by a dash, for example:
12-341234-5678872323-3984312-345678
The first part is the prefix and the second is the suffix, separated by a "-". Each part can be 2 to 6 digits, so the combined length must be between 4 and 12 digits total. A "four plus four" digits PIN is recommended, such as 8429-1921. A "two plus two" digits PIN is allowed but more vulnerable to brute force attacks.
Anti-phishing words
Entering your PIN prefix displays a pair of anti-phishing words unique to your specific device. No two Coldcards produce the same word pair for the same prefix.
Every time you log in, these words appear after you enter your prefix and before you enter your suffix. In the future, if you correctly enter your PIN prefix and the anti-phishing words that are displayed are not correct, stop and do not enter your suffix. Unfamiliar words mean the device may have been tampered with or swapped.
The words also change if you change your prefix PIN, so update your written record if you do.
Your PIN cannot be recovered
The on-device PIN explanation warns that there is no way to recover a forgotten PIN. You must press the specific key shown on screen, not just ✓, to confirm you have read the message. The device won't advance until you press the correct key.
The secure element enforces a limit of 13 attempts with no reset mechanism, including no reset by Coinkite. If all attempts are exhausted, the device permanently bricks.
Setting your PIN
When ready to set your PIN, get your Wallet Backup Card, the piece of paper shipped with your Coldcard Mk5. You will use it to write down your PIN, anti-phishing words, and seed phrase.
-
Enter your PIN prefix. Using the numeric keypad, type 2 to 6 digits as the first part of your PIN and press ✓. The device displays your two anti-phishing words.
-
Record your anti-phishing words. Write both words on the paper card now, along with your prefix digits. After recording your words, press ✓ to advance to suffix entry.
-
Enter your PIN suffix. Type 2 to 6 more digits as the second part of your PIN and press ✓. Record your suffix digits on your card.
-
Confirm your full PIN. The device runs through the full sequence again to check for entry mistakes. Re-enter your PIN prefix and press ✓. The anti-phishing words appear again, so verify they match your written record, then press ✓ to continue. Re-enter your PIN suffix and press ✓. If both parts match, the PIN is saved to the secure element and the device advances to the main menu in a blank wallet state.
If the anti-phishing words look wrong during confirmation, press X, as you likely mistyped the prefix. If you get repeated mismatches, press X twice to return to the main menu and restart PIN setup from the beginning.
Seed Phrase
After setting your PIN, the main menu shows New Seed Words along with other options. To set up a new wallet, select New Seed Words and press ✓.
Choosing your seed length
You will be offered options for 12 Words, 24 Words, and the more advanced dice roll variant of each.
The dice roll options let you contribute your own entropy. Rolling physical dice adds randomness you can independently verify, on top of the device's own randomness. The full procedure is at coldcard.com/docs/master-seed/. If you do not want to roll dice, the Coldcard Mk5 generates your seed using two independent hardware true random number generators from separate secure element vendors.
For word count, 12 words is shorter, easier to record, verify, and memorize, and is secure against all known attacks. 24 words encodes more entropy and adds an extra margin of safety against future advances in computing power. 24 words is the recommended choice. Read more about seed phrase length.
What to never do with your seed phrase
Your seed phrase is the master backup for your wallet. Anyone who sees it, photographs it, or otherwise gains access to it can recreate your wallet and spend all the bitcoin in it.
Never photograph or screenshot your seed phrase. Never type it into a phone, computer, or any app. Never email, message, or store it in any digital form, including cloud storage or password managers. Never share it with anyone, including someone claiming to be Coldcard or Coinkite support.
Write it only on paper or another physical medium, such as metal, and store it somewhere only you can access.
To learn more, see What Is a Seed Phrase? for an explanation of how your seed phrase relates to your private keys, and How to Store Your Seed Phrase for backup options and storage best practices.
Recording Your Seed Phrase
After selecting your seed phrase length, you will be shown your randomly generated seed phrase for you to record.
-
Write down all seed words in order. Write them down on your Wallet Backup Card, numbered from 1 to 12 (or 1 to 24), in clear and legible handwriting. Take your time, and double check the spelling of each word.
If you added dice rolls for extra entropy, you'll be prompted to enter them at this stage. Press ✓ to continue once you've finished.
-
Complete the seed quiz. The device will guide you through a randomized multiple-choice quiz, asking you to confirm your words and in what order they occur. Using the numeric keypad, press the corresponding number keys to identify the correct word for each question. Take your time to ensure that your recorded seed words match correctly.
If you realize your written backup contains errors and need to start over, press X, read the warning screen, and press ✓ to confirm. This discards the current seed and returns you to the word-count selection. No funds are at risk since the wallet has not been used yet.
If the quiz fails, the device allows re-attempts. Re-read your written backup carefully before trying again, checking for easily confused BIP-39 words.
-
Create a metal backup (optional). For added durability against fire, water, and physical damage, transfer your seed words onto a metal backup plate, available from coinkite.com or other third party manufacturers.
This completes initialization. When the quiz passes, the device confirms the wallet is active and returns to the main menu, showing Ready To Sign, Address Explorer, Advanced/Tools, and Settings. This confirms the device is initialized and operational.
Before storing your Coldcard, perform a full power cycle to confirm your PIN works as expected. Disconnect the USB-C cable, wait a few seconds, then reconnect it. Enter your PIN prefix and check that the anti-phishing words match your written record. Then enter your PIN suffix and confirm the device returns to the main menu. This verifies your PIN is recorded correctly and your anti-phishing words are accurate before you rely on them.
Troubleshooting
| Symptom | Likely cause | Resolution |
|---|---|---|
| Device does not power on when USB-C is connected | USB-C cable fault, insufficient power source, or loose connection | Try a different cable or power source; confirm the cable is fully seated in both the Mk5 and the power source |
| Anti-phishing words look unfamiliar at a later login | Prefix PIN entered incorrectly, or device has been swapped | Re-enter the prefix carefully; if words still do not match your record, do not enter the suffix and contact support@coinkite.com |
| Seed quiz fails repeatedly | Transcription error in written backup, or keypad letter cycling produced wrong characters | Re-read each written word carefully before the next attempt; use the X key to delete and re-enter characters if the wrong letter was selected |
| Keypad entry during quiz produces incorrect letters | Letter cycling moved past the target character | Press the X key to delete the current character and re-enter it; the screen shows the currently selected letter |
| Device shows Login Countdown after PIN failures | Multiple incorrect PIN attempts triggered a delay timer | Wait for the countdown to complete before trying again; do not disconnect USB-C during the countdown |
What to do next
Your Coldcard Mk5 is initialized, your seed phrase is written down and verified, and your PIN is confirmed working. The next step is connecting the Mk5 to a coordinator software, such as Sparrow Wallet. Sparrow can track your wallet balance and prepare transactions for the Mk5 to sign, all without the Mk5 ever connecting to the internet.
Next guide: Coldcard and Sparrow Wallet Setup covers exporting your wallet descriptor from the Mk5 and setting up a watch-only wallet in Sparrow.
Seed phrase information: How to Store Your Seed Phrase for backup options and storage best practices.
Further reading: What is air-gapped signing? explains the signing workflow the Mk5 is now ready to perform.
Related guides
Set Up Your Coldcard Q
The Q equivalent with the same setup milestones, featuring a QWERTY keyboard and battery power options.
Coldcard and Sparrow Wallet Setup
Connect your initialized Mk5 to Sparrow Wallet as a watch-only wallet.
What is Air-Gapped Signing?
The signing workflow your Mk5 is now ready to perform. No internet connection required.
MicroSD Card Air-Gapped Signing with Coldcard
Step-by-step guide to air-gapped signing a bitcoin transaction using a MicroSD card.